
1. Python
Python is an interpreted high-level programming language used in many modules with a numerical computing component. There are several ways to install Python on your computer, but most modules will assume that you are using the Anaconda distribution, so that’s the one whose installation we primarily document here. If you have another Python 3 distribution installed, then this is likely to work, however your mechanism for installing additional Python packages may not be the same as that documented in the lecture materials, so you may have to sort that out for yourself.
1.1. Python 2 and Python 3
Python has just completed a decade-long major version transition from Python 2 to Python 3. As of 1 January 2020 Python 2 is officially unsupported, even for critical security updates. The instructions here are for the installation of Python 3. Don’t try to use Python 2 for your work as it is unsupported and increasingly likely to have breakages which won’t be fixed.
1.2. Installing Python in Windows
You can obtain Anaconda using the Anaconda Windows installation site. Simply follow the instructions there to download and run the installer.
1.3. Installing Python on Mac
1.3.1. Homebrew install Anaconda
If you’ve installed Homebrew for Mac then you can install Anaconda by to opening a terminal and run the following command:
$ brew cask install anaconda
When asked, enter your Mac password. On this occasion we’re not quite done because Homebrew is quite conservative about installing a new Python over another one you might have installed. We’re going to need to tell the terminal that we want Anaconda to be our default Python.
The way we do this depends slightly on which command line program (or “shell”) we are using. The default on recent MacOS is zsh, but if you’ve been using MacOS for a while and haven’t changed, you might be using bash. Just to be on the safe side, we’ll run both commands. If you know for sure which shell you are using, then you can just run the appropriate one. If you’re not sure, run both:
$ echo 'export PATH=/usr/local/anaconda3/bin:$PATH' >> ~/.zshrc
$ echo 'export PATH=/usr/local/anaconda3/bin:$PATH' >> ~/.bash_profile
Then close the terminal and open a new one to make sure the changes have taken effect. Run the following command to check that Anaconda is working properly:
$ conda --version
conda 4.8.3
Don’t worry if the version you see installed is not the same as that listed here.
1.3.2. Download and install Anaconda
You can also install Anaconda on your Mac by downloading the Anaconda installer and installing it yourself. This is documented on the Anaconda MacOS installation website.
1.3.3. Homebrew Python
An alternative to using Anaconda is to install Python directly using Homebrew. Simply run:
$ brew install python
This will automatically ensure that the command python3 points to the correct Python installation, however the Python package installation mechanism won’t be the Anaconda one. Instead you will use Python’s standard package installer pip. For example if you need to install numpy and matplotlib (the core numerical computing and plotting packages), as well as support for Jupyter notebook, you would run:
$ python3 -m pip install numpy matplotlib jupyter
Warning
MacOS also comes with Python pre-installed. However this is a very cut-down version which is really only intended for internal use by the operating system. You should install a fully-featured Python (i.e. Anaconda or Homebrew).
1.4. Installing Python on Linux or Chrome OS 1
Every Linux distribution includes a fully-featured Python, and this might well be enough for your needs. However if you would prefer to have the same Python distribution as most of your classmates, then there are instructions for installing Anaconda on the Anaconda Linux install website.
1.4.1. Installing Python packages on Linux
If you’re using the system-installed Python, as opposed to Anaconda, then you should use the Python package manager pip to install any additional packages that you need. There are a couple of issues with this of which you should be aware. First, not all Linux distributions install pip by default, often you need to install an additional package called something like python-pip. For example, on Ubuntu you would run:
$ sudo apt-get install python3-pip
In some cases, it can become confusing which version of Python a particular pip installation belongs to. This can be avoided by always invoking pip using python3 -m pip rather than just typing pip or pip3.
While on Fedora and related distributions, you would run:
$ sudo dnf install python-pip
It’s also possible to install quite a lot of Python packages using the Linux package manager in a similar way. However, you will probably want to install at least some packages using pip. For example if you wanted to install Jupyter you would type:
$ python3 -m pip install --user jupyter
The --user option tells pip to just install for the current user. This is preferable to using sudo and to install packages globally, as it removes any risk of interfering with packages that the operating system needs.
1.5. Python Virtual Environments
Before we move on to actually installing packages, we need to give a little thought to where the packages are to be installed. We could simply install packages into the Python installation on our computer. This can be a reasonable approach if all you want to do is run code from the default versions of public packages. However, it has a number of limitations. Basically, a Python installation is a single namespace for packages, so if two different projects you are working on need two different versions of the same package, you’re out of luck. Similarly, if you are working on changes to a package, you probably don’t want your half-finished experimental work to be the package that your other projects use.
Python virtual environments, or venvs, are separate namespaces within a Python installation. They have their own Python command and collection of packages. Effectively they behave like their own separate Python installation, except that most of the core Python files are shared, so a venv takes rather little additional space.
1.5.1. Creating a venv
The most straightforward way to create a venv is on the terminal
command line, not from within Python itself. This is accomplished
using Python’s venv package. For example, to create a venv
called my_venv on Windows, you would type:
> py -m venv my_venv
while on Mac or Linux you would type:
$ python3 -m venv my_venv
Don’t forget that the $ stands for the command prompt: you don’t type it. This command will create the folder my_venv and various subfolders containing things like the Python program itself and space for any packages which you install in the venv. If there was already a file or folder called my_venv in the current folder then you’ll get an error, so make sure you choose a new name.
A venv doesn’t usually contain any particularly valuable data, so you should regard them as essentially disposable. In particular, if something goes wrong when creating a venv, just delete it and start again. In the bash or zsh shells you would type:
$ rm -rf my_venv
Warning
rm -rf will delete its argument and all its subdirectories without further prompts or warnings. There is no undo operation. Be very careful about what you delete.
1.5.2. Using a venv
If you run Python from the terminal, then the simplest way to use the venv is to source its activate script. If using bash or zsh on Mac or Linux you would type:
$ source my_venv/bin/activate
while using bash on Windows you would type:
$ source my_venv/Scripts/activate
If using PowerShell on Windows then you type:
> .\my_venv\Scripts\activate.ps1
Obviously, you would use the folder name of your venv instead of my_venv. In either case, your command prompt will change to indicate that you are now using the venv. It might look something like:
(my_venv) $
Any subsequent invocations of Python commands such as python3 will
now use the version from the venv, with access to whatever packages
you have installed in that venv. If you are using a terminal shell
other than bash or zsh, then see the venv package documentation
for the correct activation command.
Hint
The default permissions settings on your Windows computer may not permit you to run the activation script. This can be fixed by running:
> Set-ExecutionPolicy -ExecutionPolicy RemoteSigned -Scope CurrentUser
For further information, see the official Python venv documentation.
Hint
Venv activation is just for one terminal session. You need to activate the venv every time you open a new terminal. If you find that Python can’t find your packages or tests, then the first thing to check is whether you remembered to activate the venv.
1.5.3. Installing packages in a venv
When the venv is active, the pip installing packages will use the pip from the venv, and the packages will be installed in the venv and not globally. For example if you needed Numpy and Matplotlib, you would type the following in the terminal:
(my_venv) $ python -m pip install numpy matplotlib
1.6. Recommended folder layout for a Python module
In order to do the coursework for a typical module using Python, you’ll want to have a venv for the module, so that packages and software you use in different modules don’t interfere with each other, and you’ll usually want to have one folder for each assignment that is set in the module. If the module is using GitHub Classroom then each of these exercise folders will be a git repository.
Suppose, then, that we are taking a module called Principles of Programming. We would use a folder structure like this:
principles_of_programming
├── PoP_venv
├── exercise_1
├── exercise_2
├── exercise_3
└── ...
Let’s see how we would set this up. First, open a terminal. You can also do several of these steps graphically, but the precise steps are harder to explain, and are different on different operating systems.
The terminal will usually open in your home folder. Maybe you want to put the module folder straight in your home folder, or maybe you want to put it somewhere else. This just comes down to how you organise the files on your computer. On my computer, I like to keep this sort of folder in a documents folder called doc. So I need to switch into that folder first with the cd (change directory) command:
$ cd doc
Now we create the main module folder using mkdir (make directory):
$ mkdir principles_of_programming
Hint
Avoid spaces in names
Even though spaces are usually allowed in file and folder names, many software packages contain bugs which cause them to fail to handle spaces in names correctly. It’s therefore good practice not to have spaces in file or folder names.
Now we change into the folder we just created:
$ cd principles_of_programming
Hint
Use tab completion
Most modern terminals (or, rather, the shell program inside) support tab completion. This means that you can press the tab key to have the terminal complete command and file names. In this example, rather that typing out principles_of_programming, you can type pr + tab and, so long as this is the only name in the current folder starting with pr, the shell will insert the rest of the name. If there are more names starting with pr then you may have to type more characters before tab completion will work.
Tab completion is often preferable to typing because it’s not only faster but avoids typos.
Next we create the venv. We could call it anything we like, but we would probably like a name which is short (because it’s going to appear at the start of every line in the terminal), describes which venv this is, and says that it’s a venv. In this case, the name PoP_venv will do nicely:
$ py -m venv PoP_venv
on Windows, or on Mac or Linux:
$ python3 -m venv PoP_venv
When that completes, we’ll need to activate the venv. On Windows we would type:
$ source PoP_venv/Scripts/activate
While on Mac or Linux it would be:
$ source PoP_venv/bin/activate
Next we’ll install whichever Python packages we need for the module. Let’s suppose we just need Jupyter:
(PoP_venv) $ python -m pip install jupyter
Finally, we’ll need to create the folder for the first exercise on our module. If the module is not using GitHub Classroom then you’ll just use mkdir to make a folder for each exercise. However for GitHub Classroom modules there will be a Git repository to clone for each exercise. As a demonstration, we can use this example Git repository. Unlike most coursework repositories, this one is public so anyone can clone it. Assuming we’ve installed Git, we can type:
(PoP_venv) $ git clone https://github.com/imperiallearn/exercise_1.git
If we now examine the contents of the current folder with ls (list) then we can see that we have the venv folder and the exercise folder as expected:
(PoP_venv) $ ls
exercise_1  PoP_venv
The exercise_1 repository contains a simple “Hello World” program written as both a Python file and a Jupyter notebook. For example we can run the file version thus:
(PoP_venv) $ python exercise_1/hello.py
Hello World!
Or we can launch the Jupyter version:
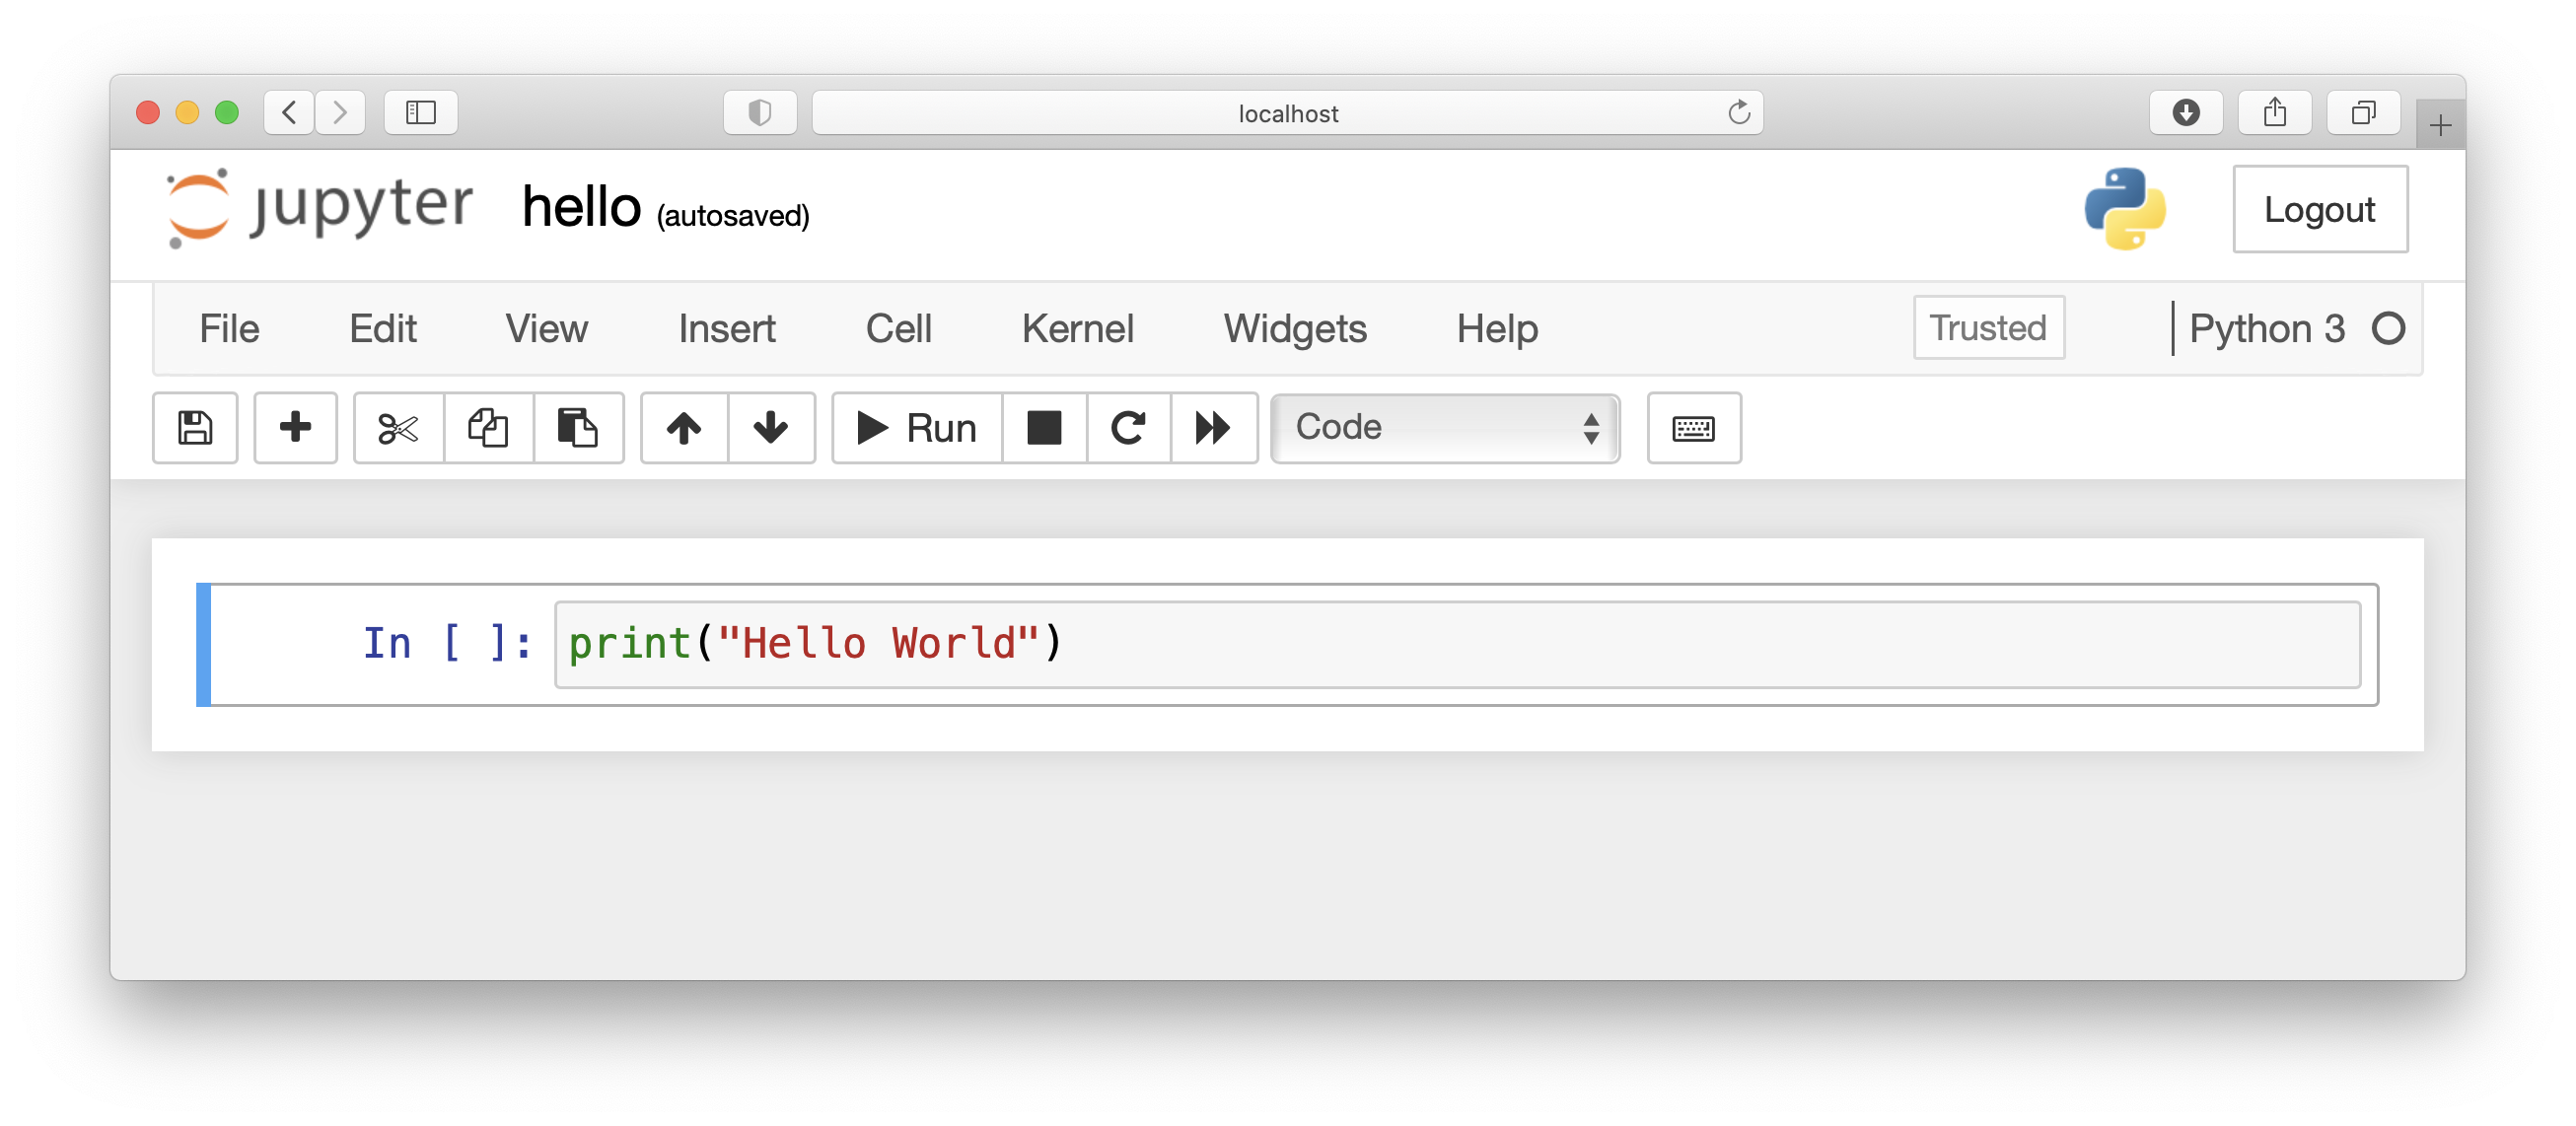
(PoP_venv) $ cd exercise_1
(PoP_venv) $ jupyter notebook hello.ipynb
This pops up a web browser showing:
1.7. Using Visual Studio Code with Python
Visual Studio Code provides excellent support for editing and debugging Python, both plain Python files and Jupyter Notebooks. Visual Studio Code also supports Python virtual environments, and revision control in Git.
1.7.1. Opening your Python project as a workspace
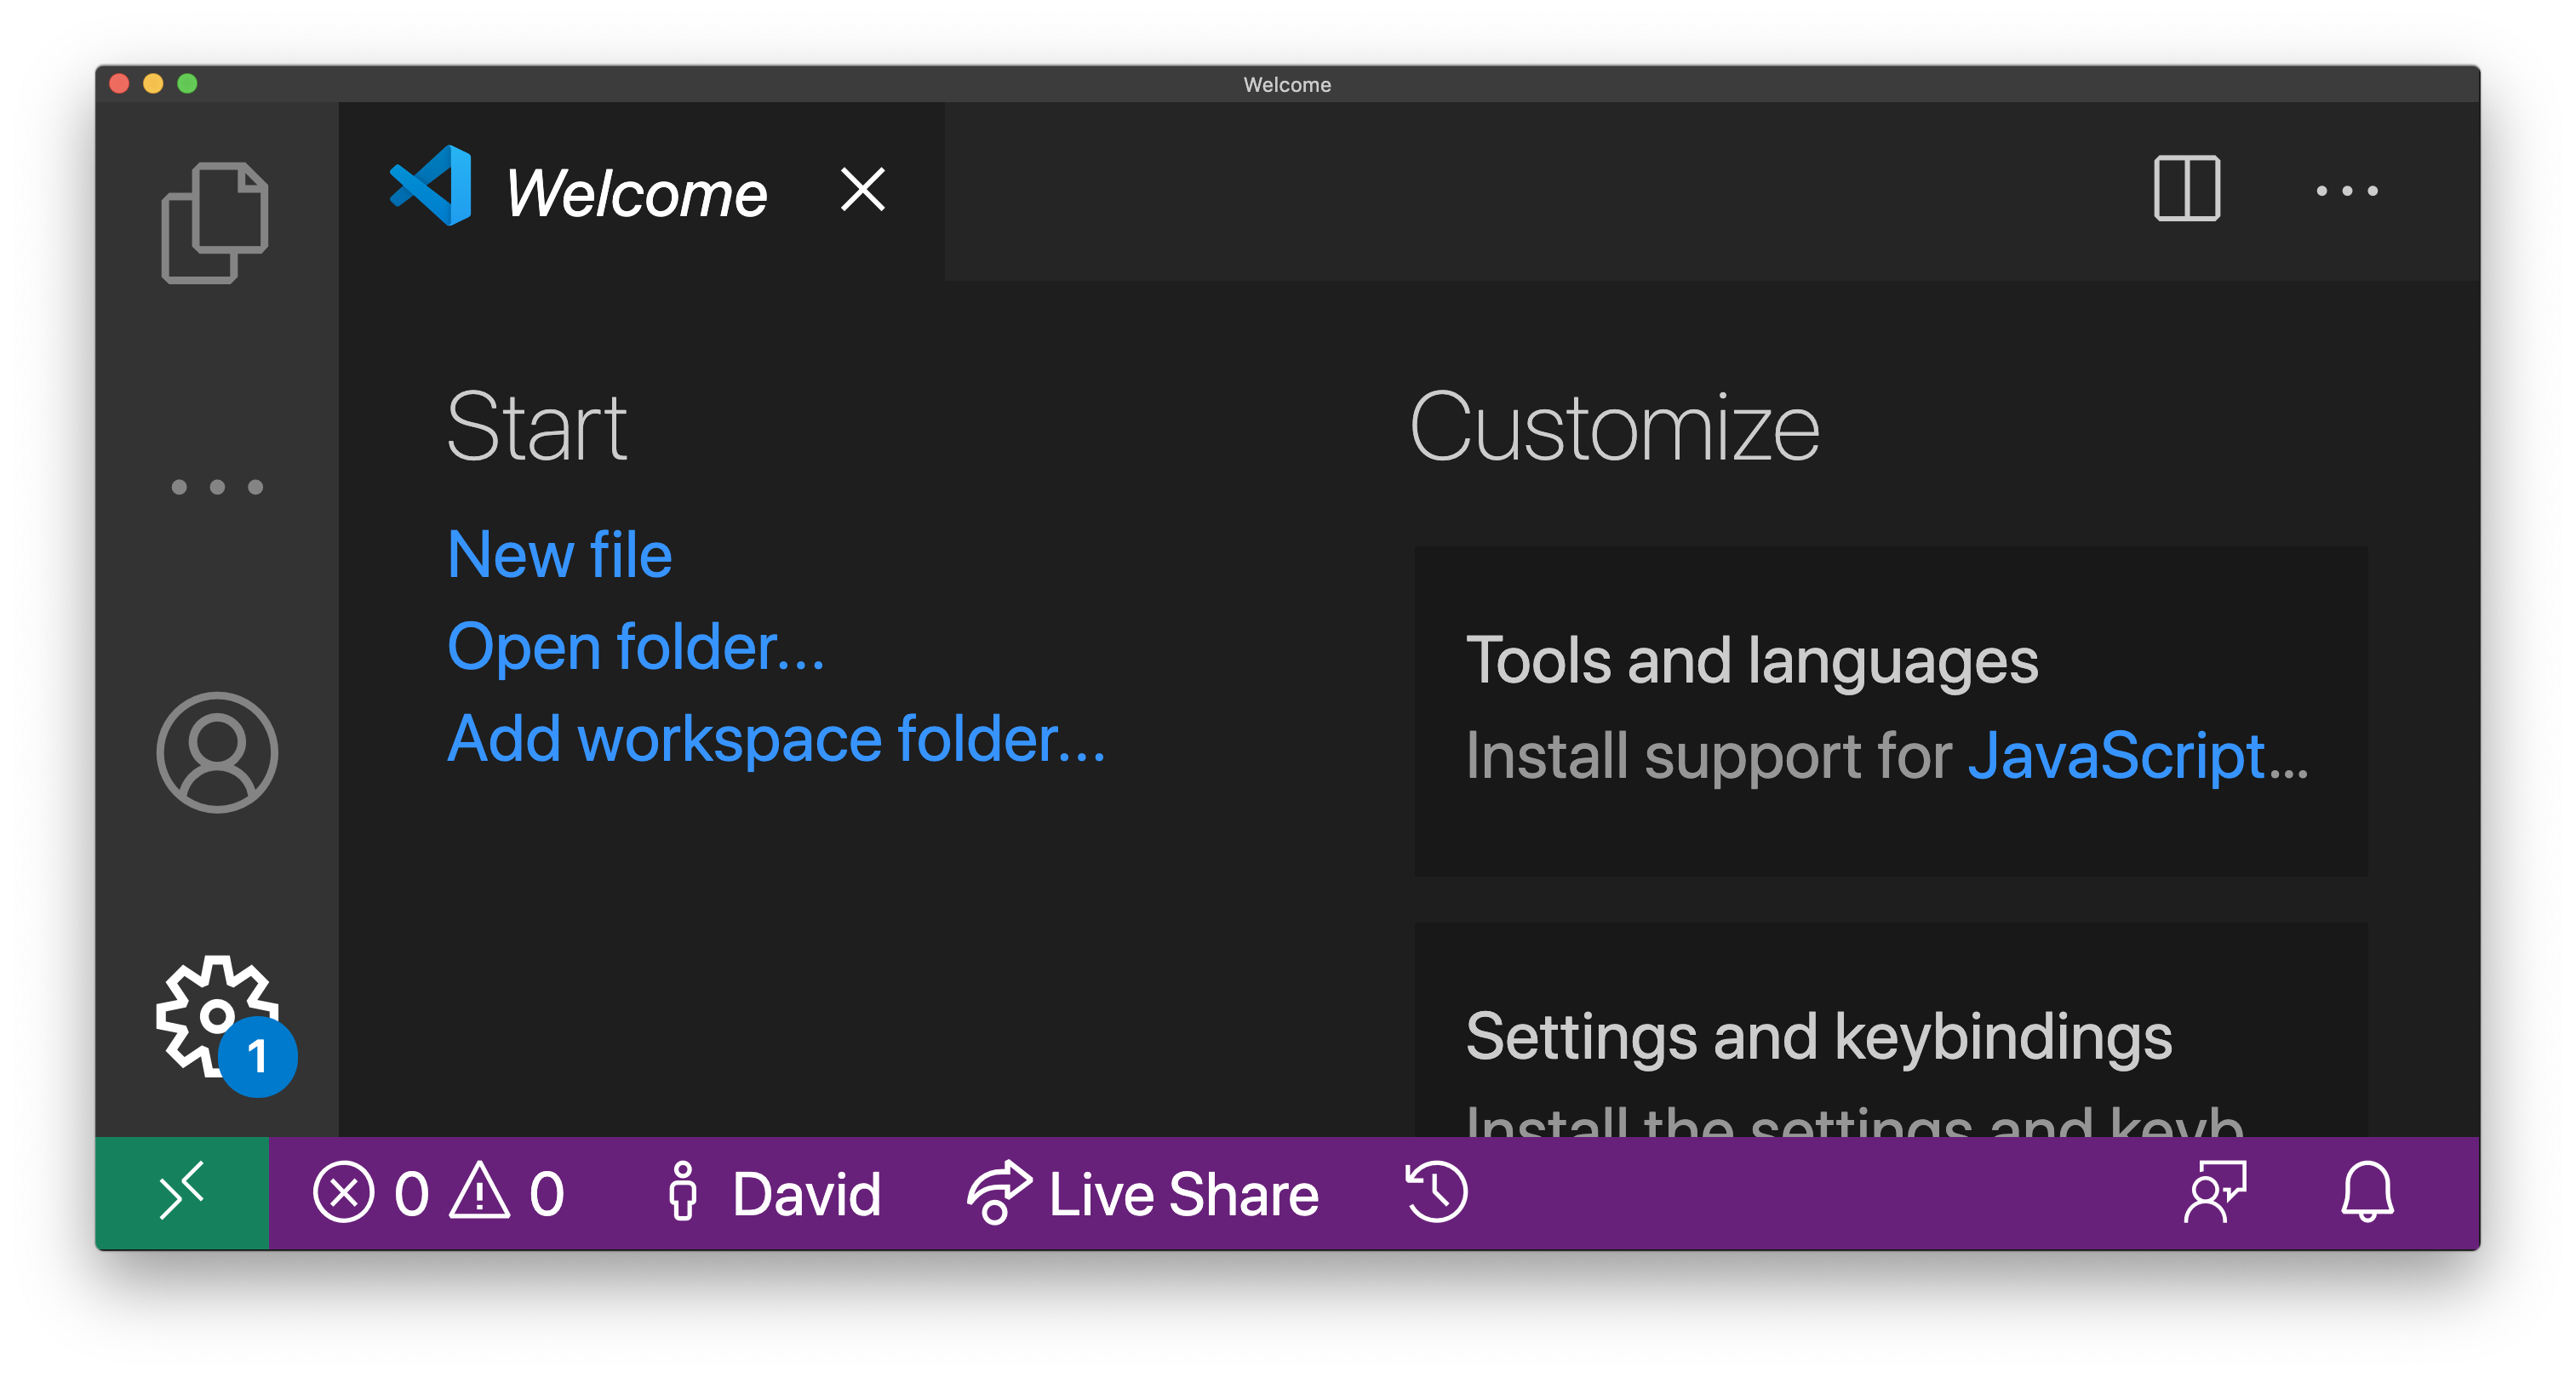
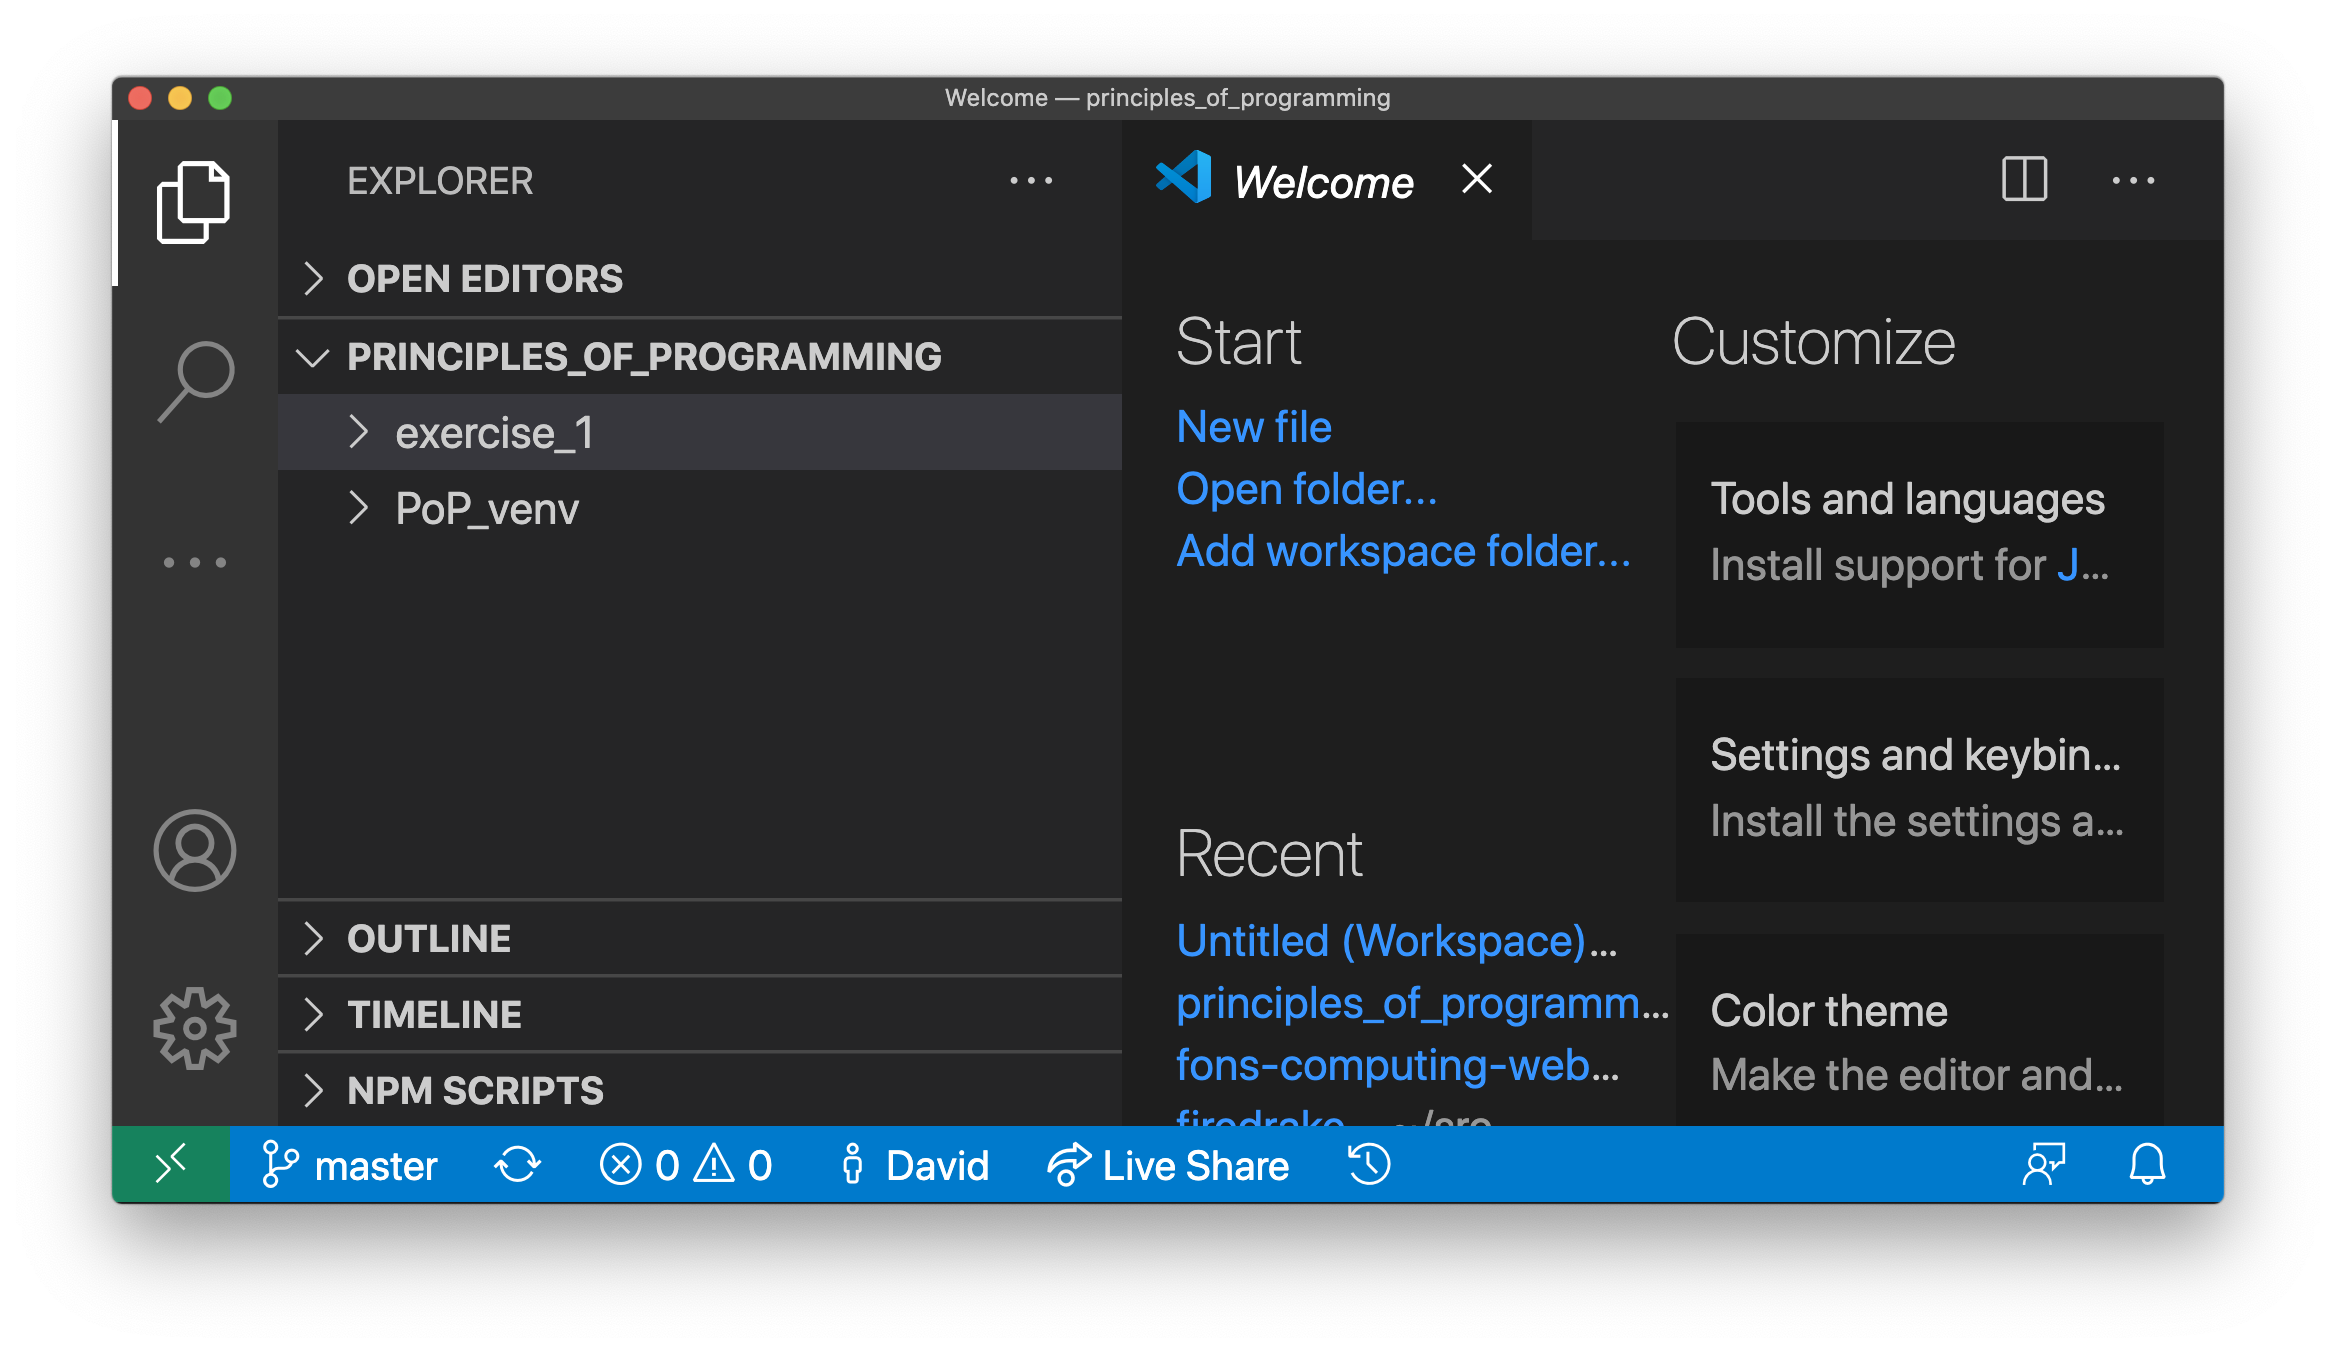
We’ll assume here that you’ve set up your Python folder structure as we recommended above. One of the reasons for choosing that folder structure is that it works well with Visual Studio Code. Having installed Visual Studio Code, and launched it, you should see a screen like this:
Click on Open folder... and select the module folder from the dialog (in the case above, the folder principles_of_programming). You should see a screen somewhat like this:
1.7.2. Running a Python file
Click on the little arrow > next to exercise_1 and then click hello.py to open it. If this is the first time you’ve opened a Python file in Visual Studio code, it may prompt you to install the Python extension, and you should agree. It might also prompt you to install a Python linter, which is a program which checks your code against the Python style rules. You should agree to that too. The result should look something like the following:
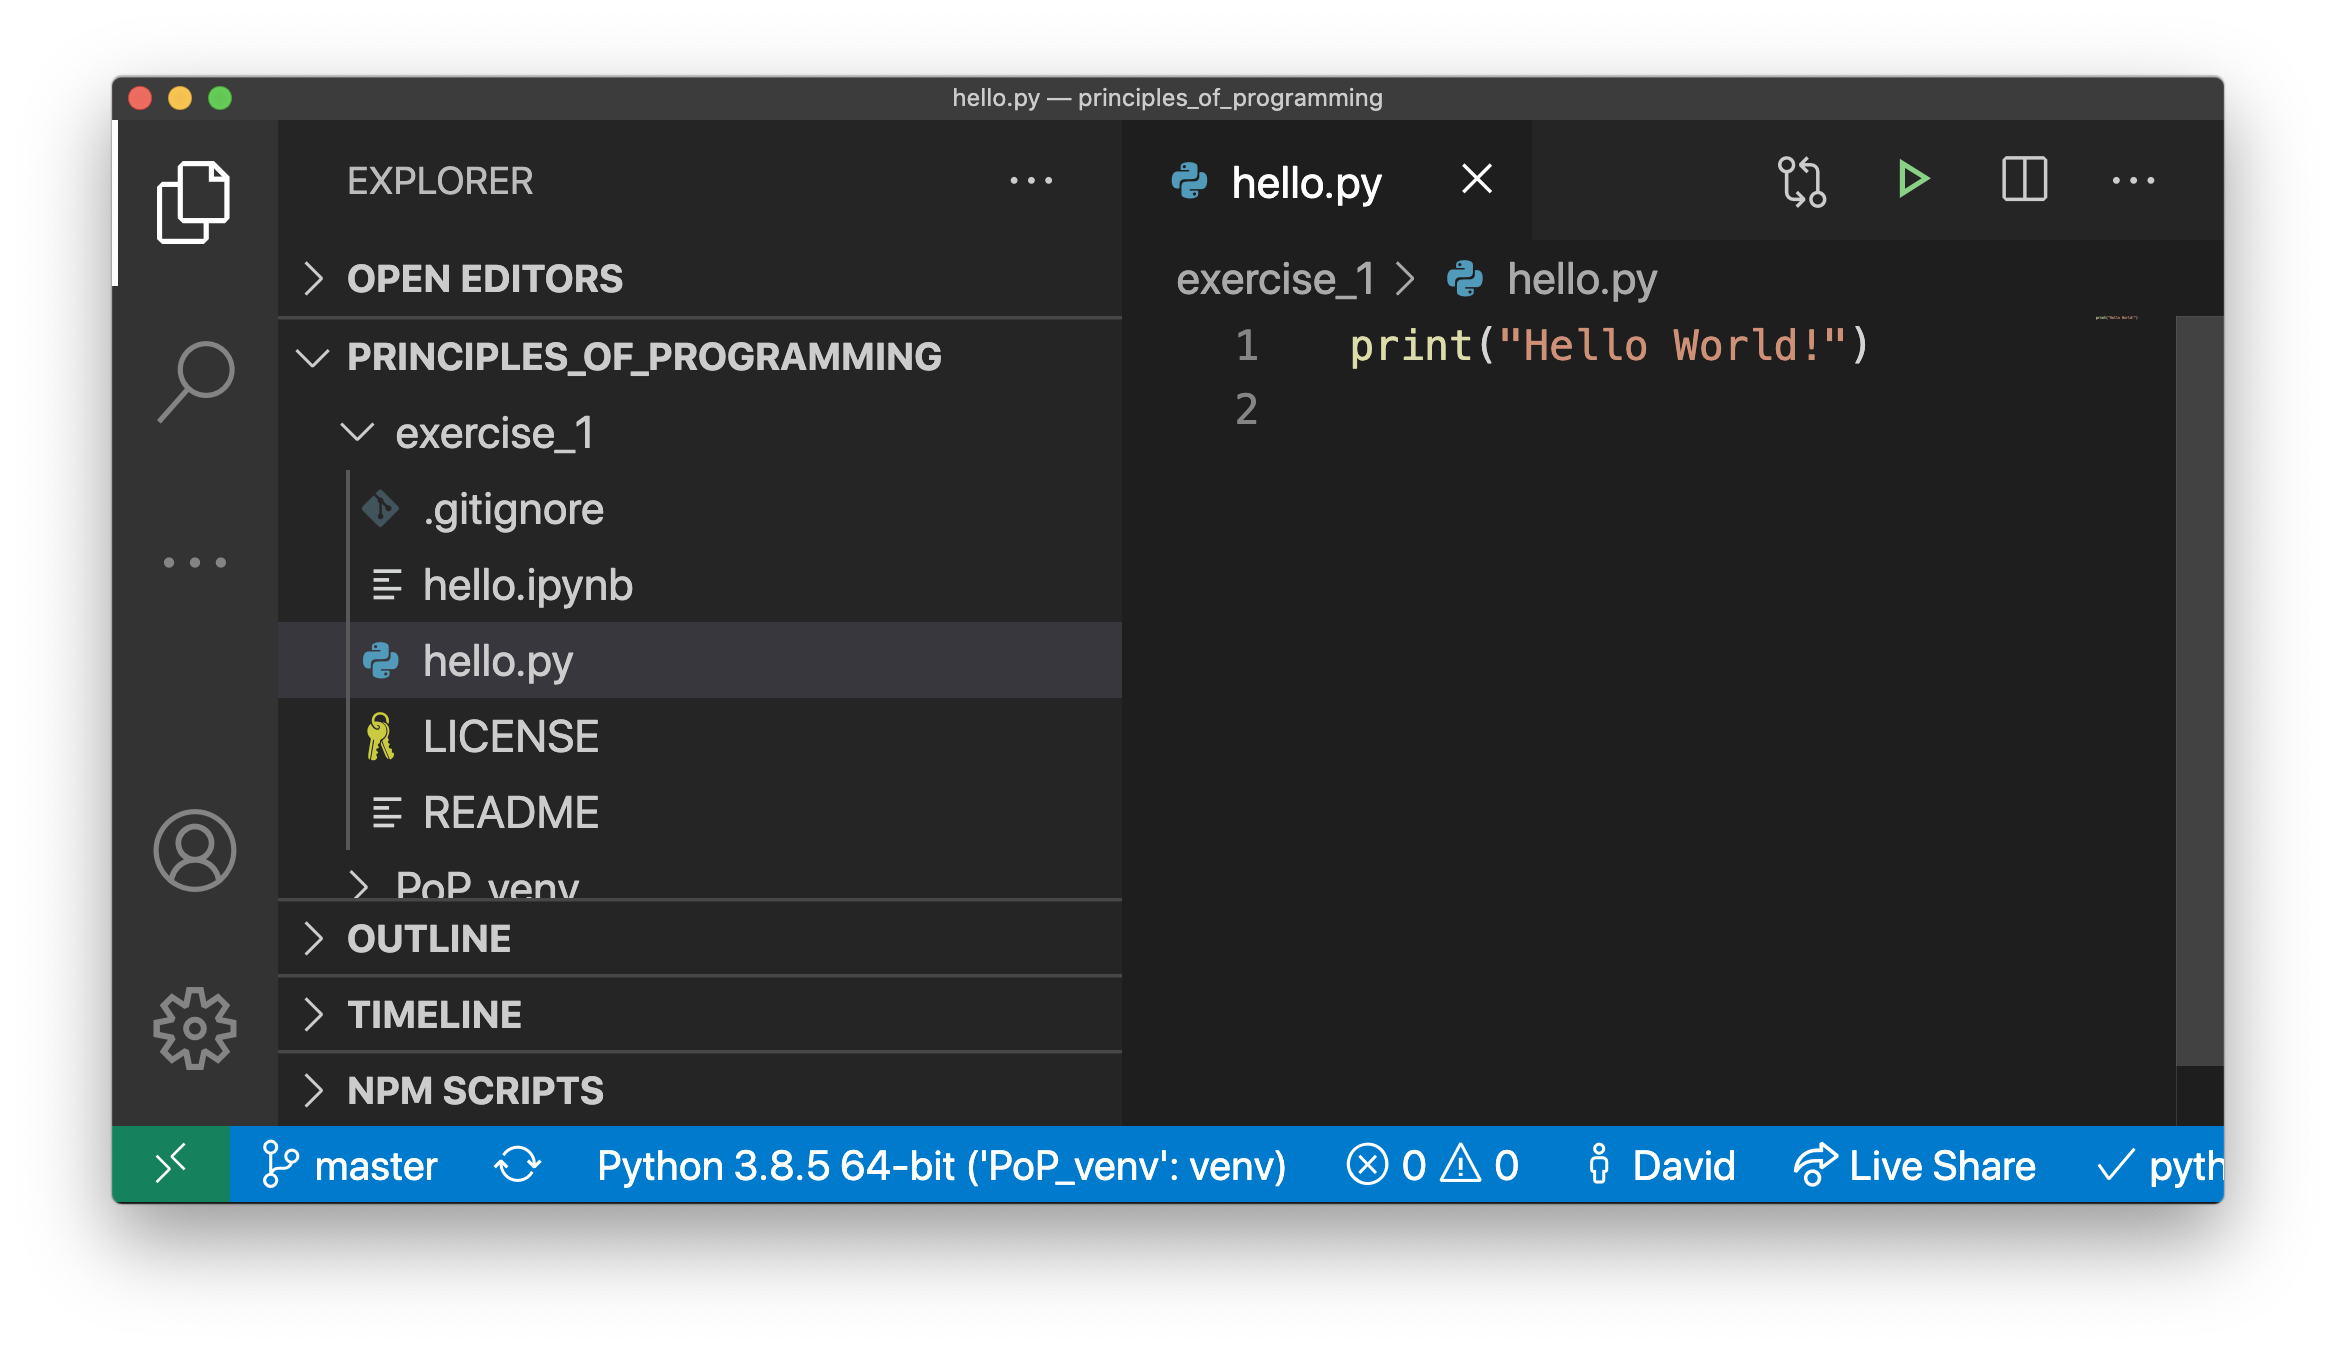
There are two important things to note here. The first is the text at the bottom Python 3.8.5 64-bit ('PoP_venv':venv). This shows us which Python installation Visual Studio Code is using, and in particular that it’s found our PoP_venv virtual environment. Visual Studio will automatically find a virtual environment that is in the folder you open, which is one of the reasons for our folder layout. The other important feature is the green triangle at the top right. Clicking on this will open a terminal and run this code:
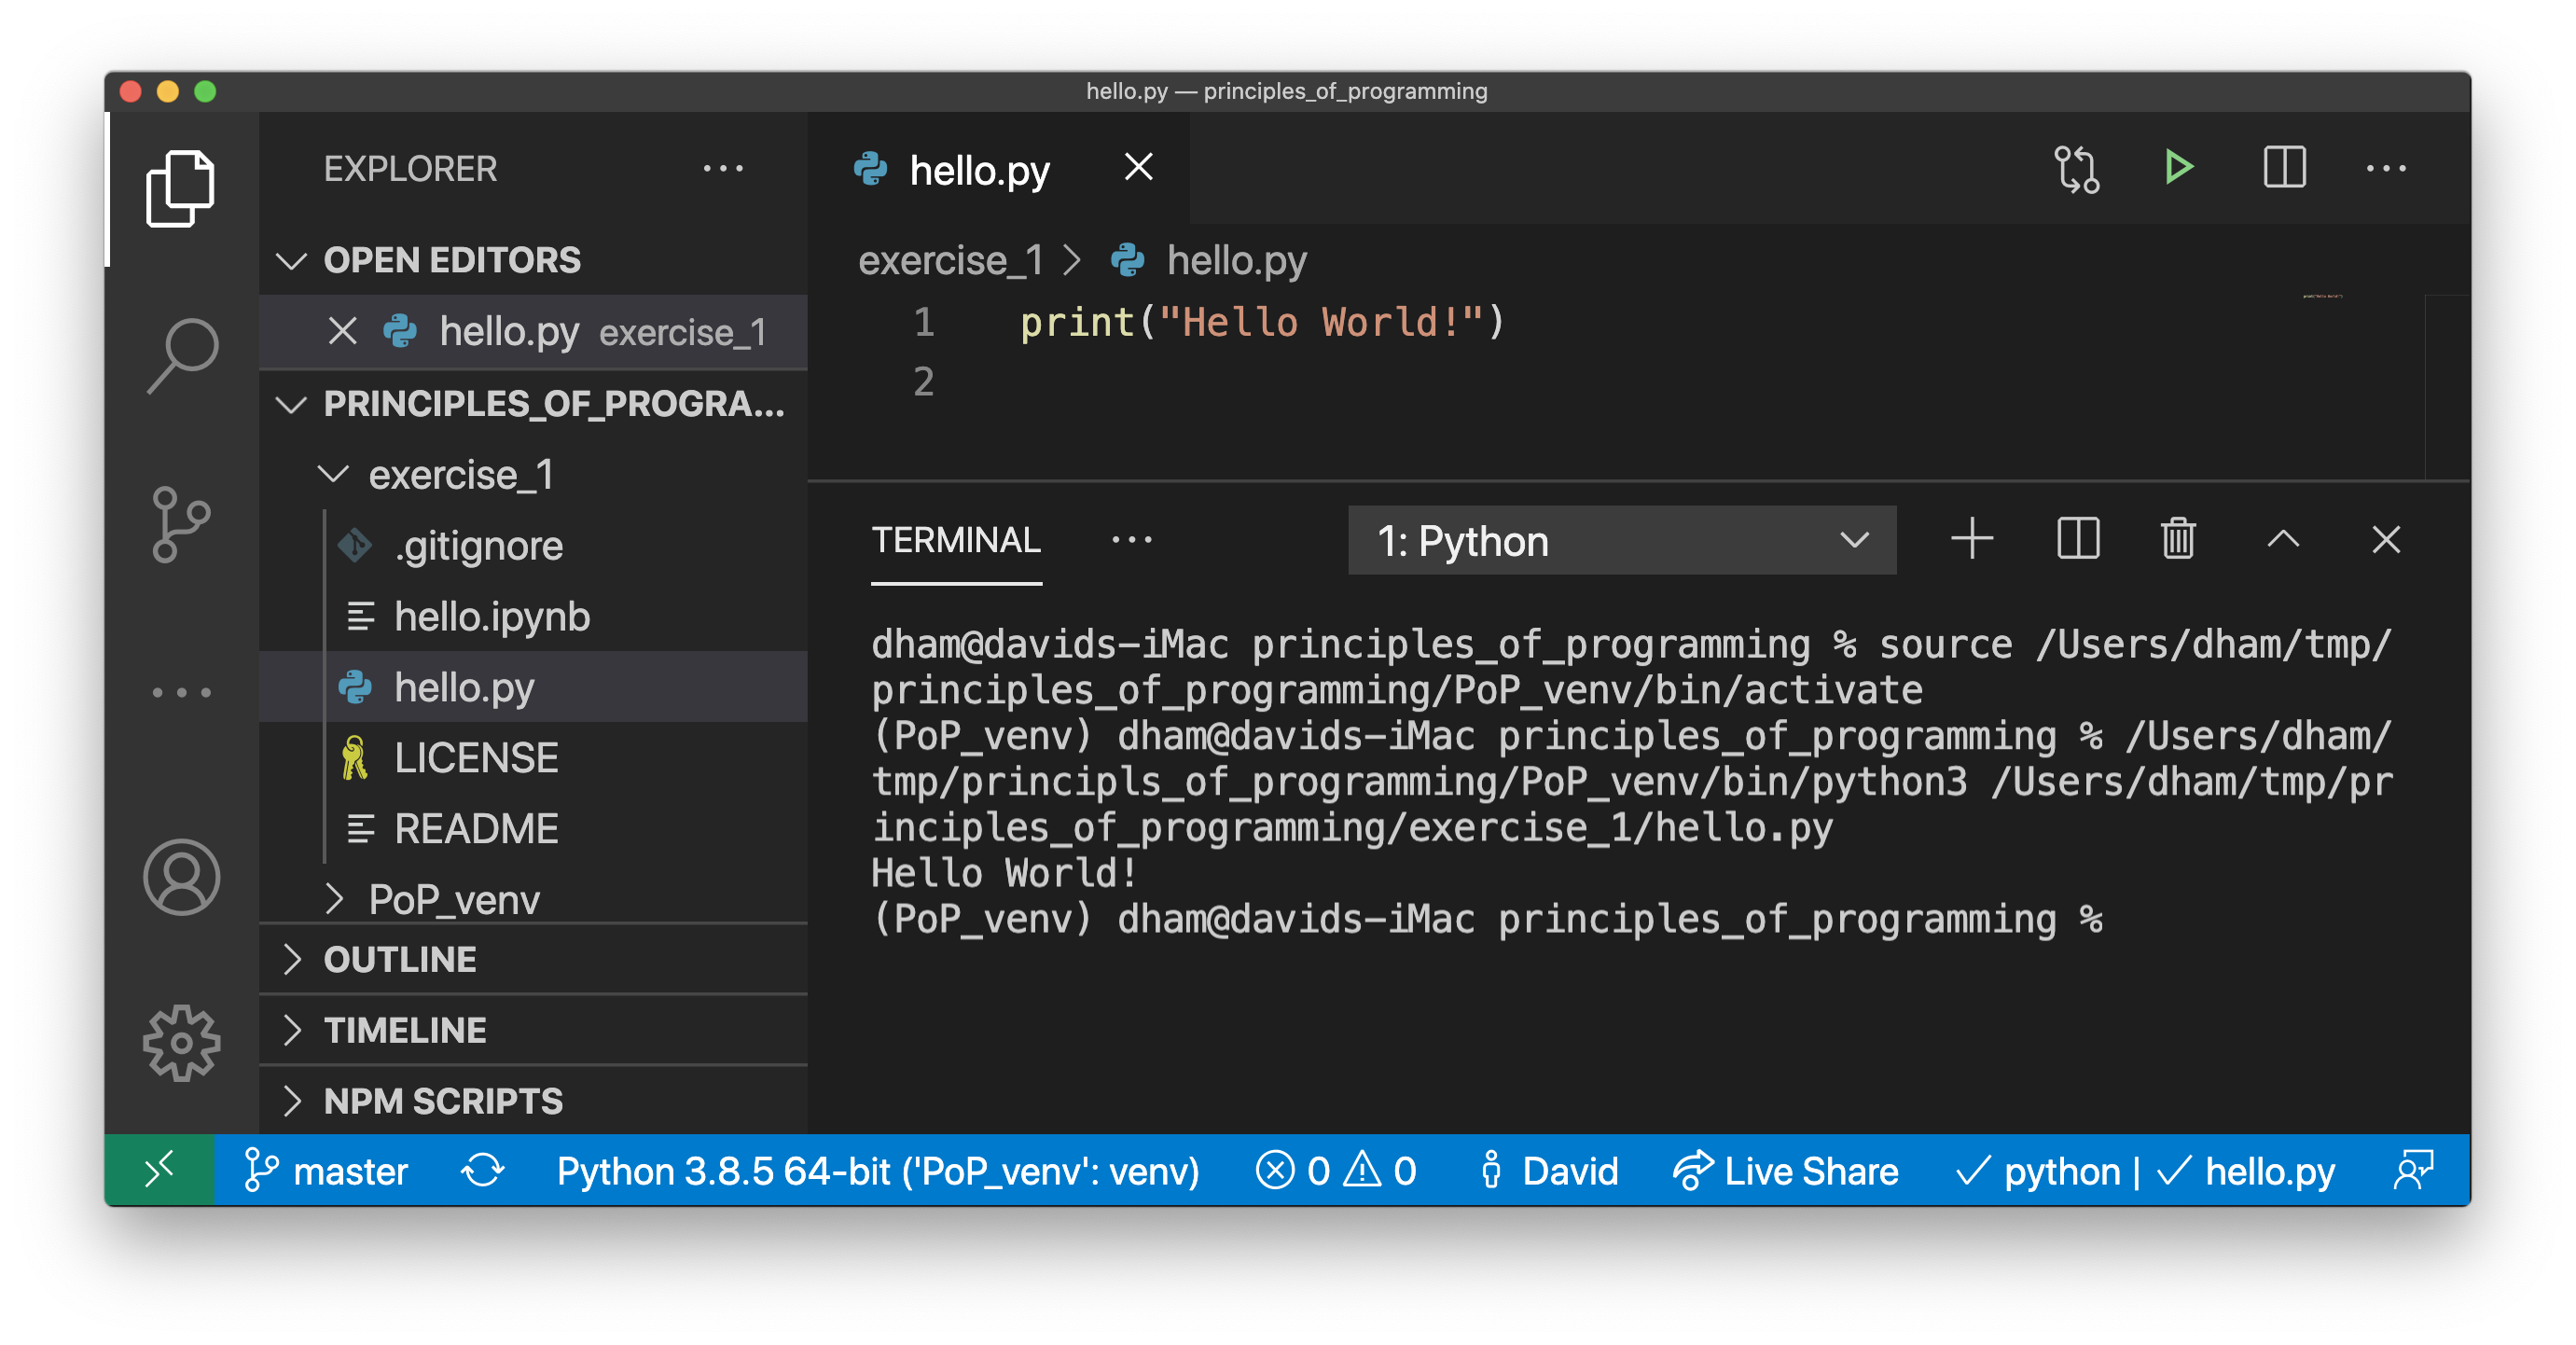
Looking at the bottom left, we can see that Visual Studio Code has opened a terminal, activated the virtual environment, and then run Python on our file hello.py. The result is the text Hello World! printed out.
1.7.3. Opening a Jupyter notebook
If we instead click on hello.ipynb then this Jupyter notebook will open. You might be asked whether to trust the notebook, and you should agree. The result will be something like this:
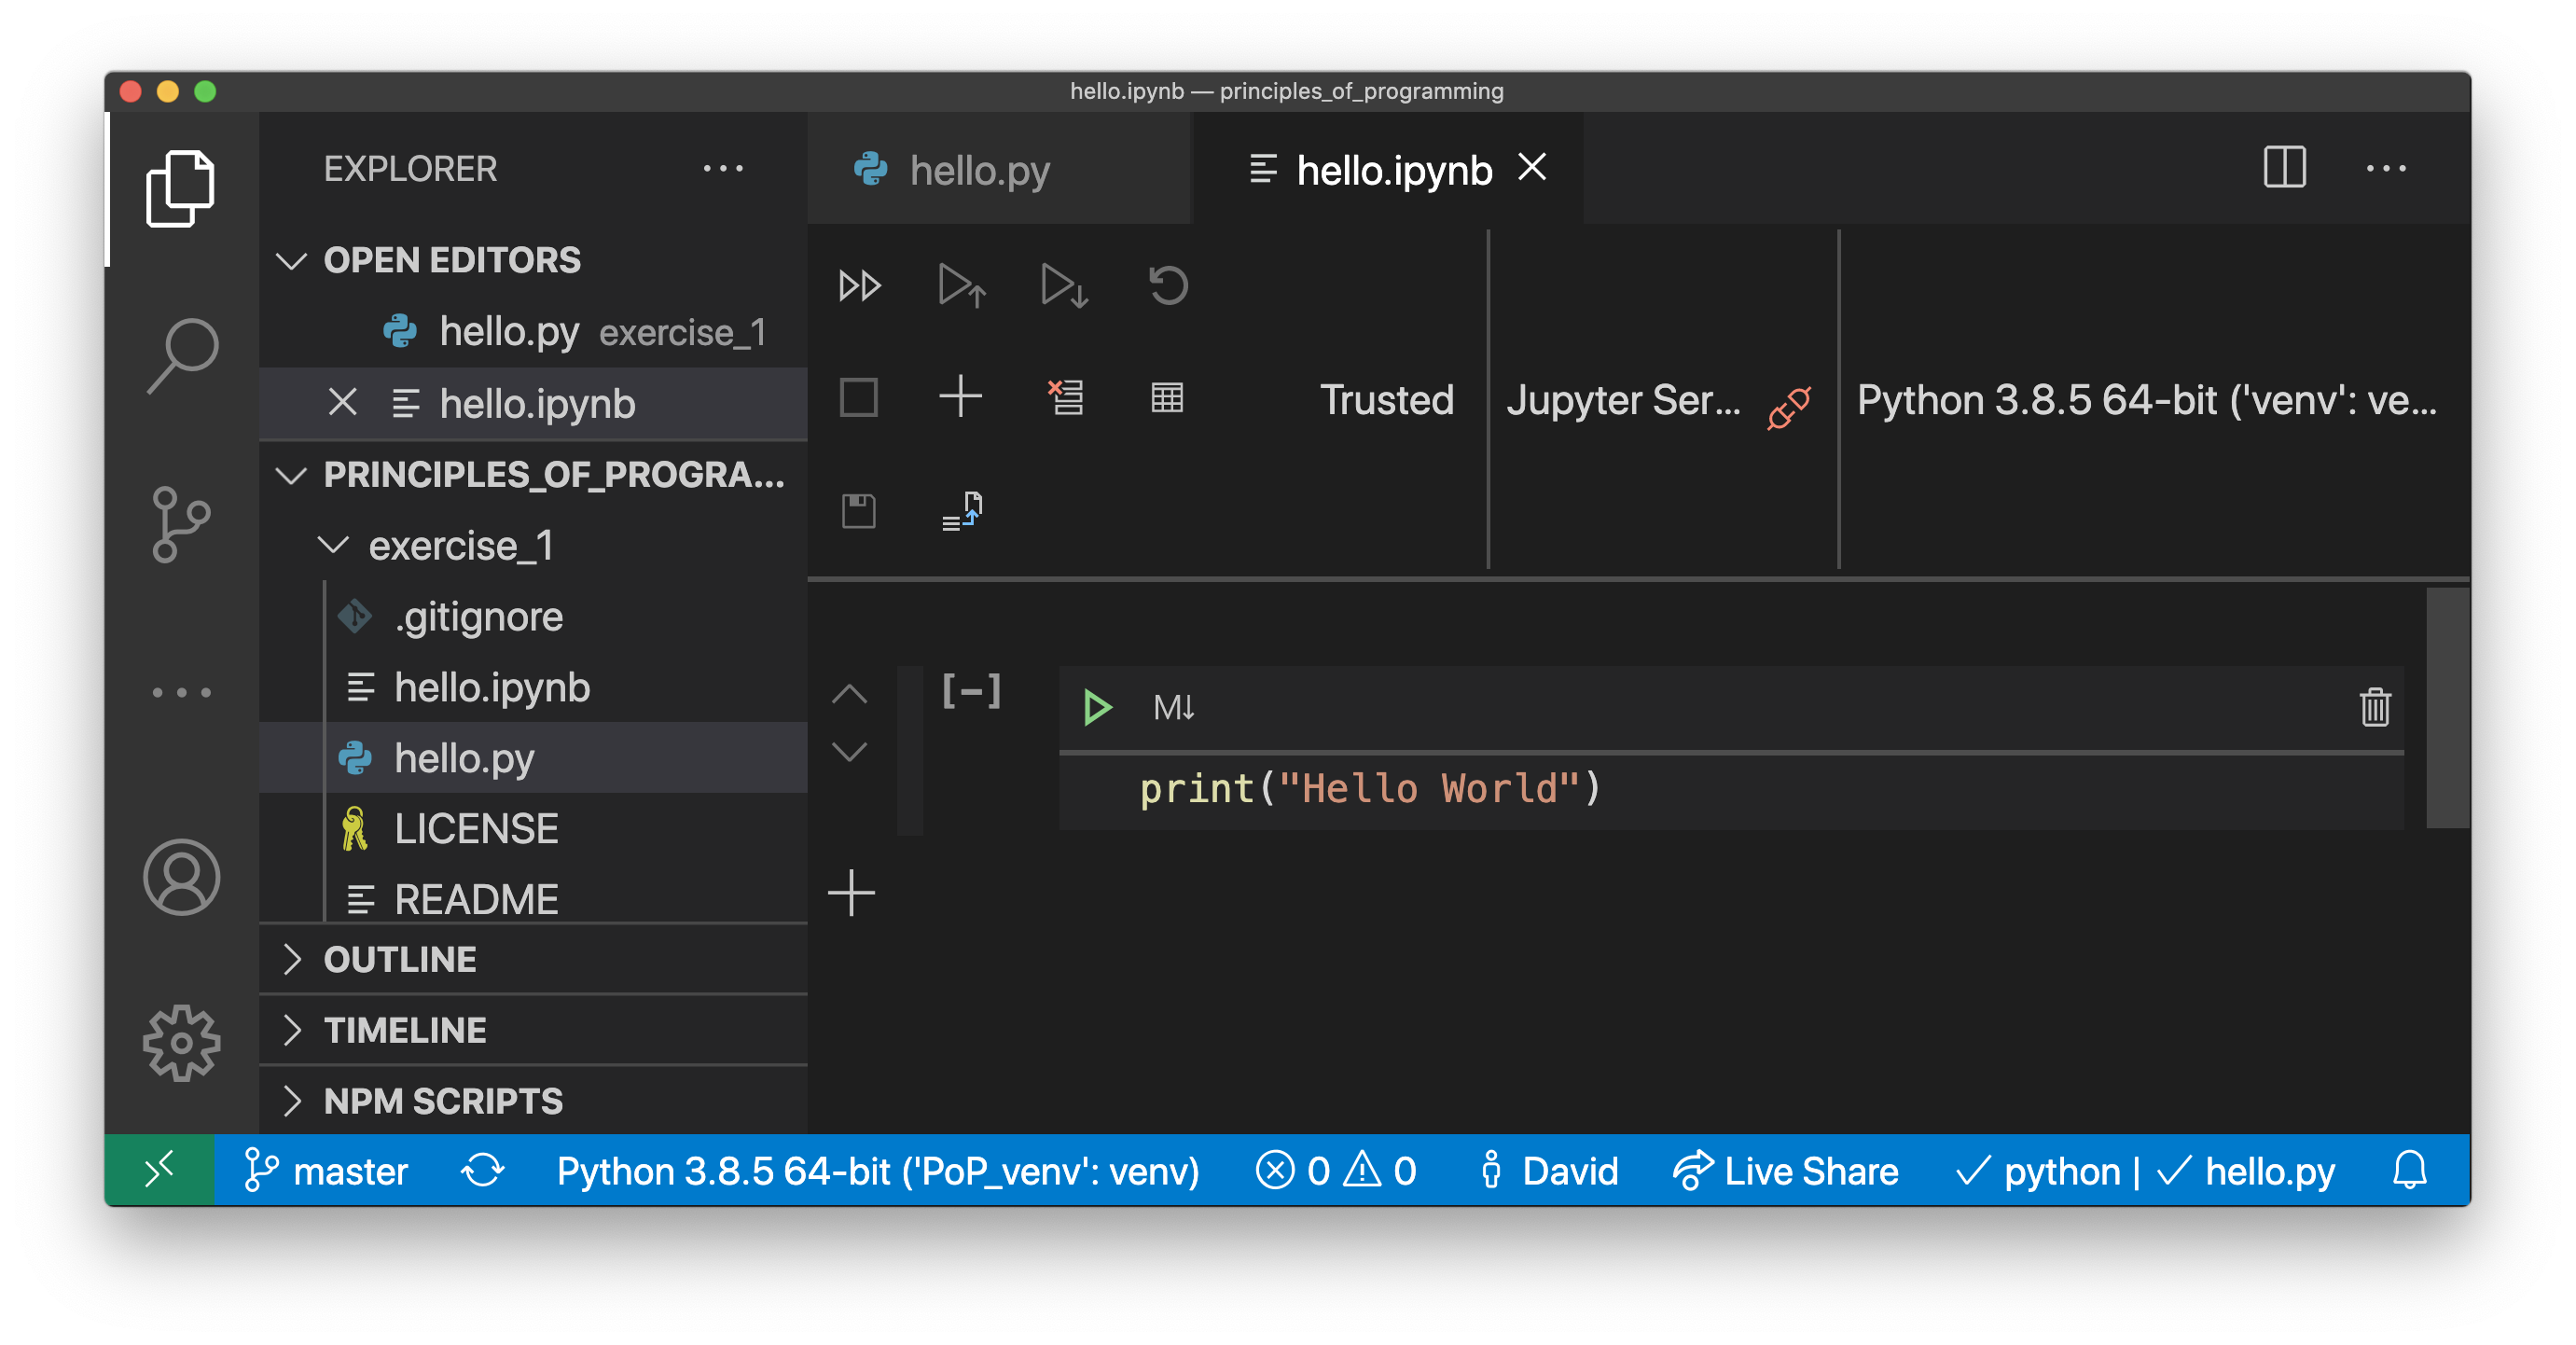
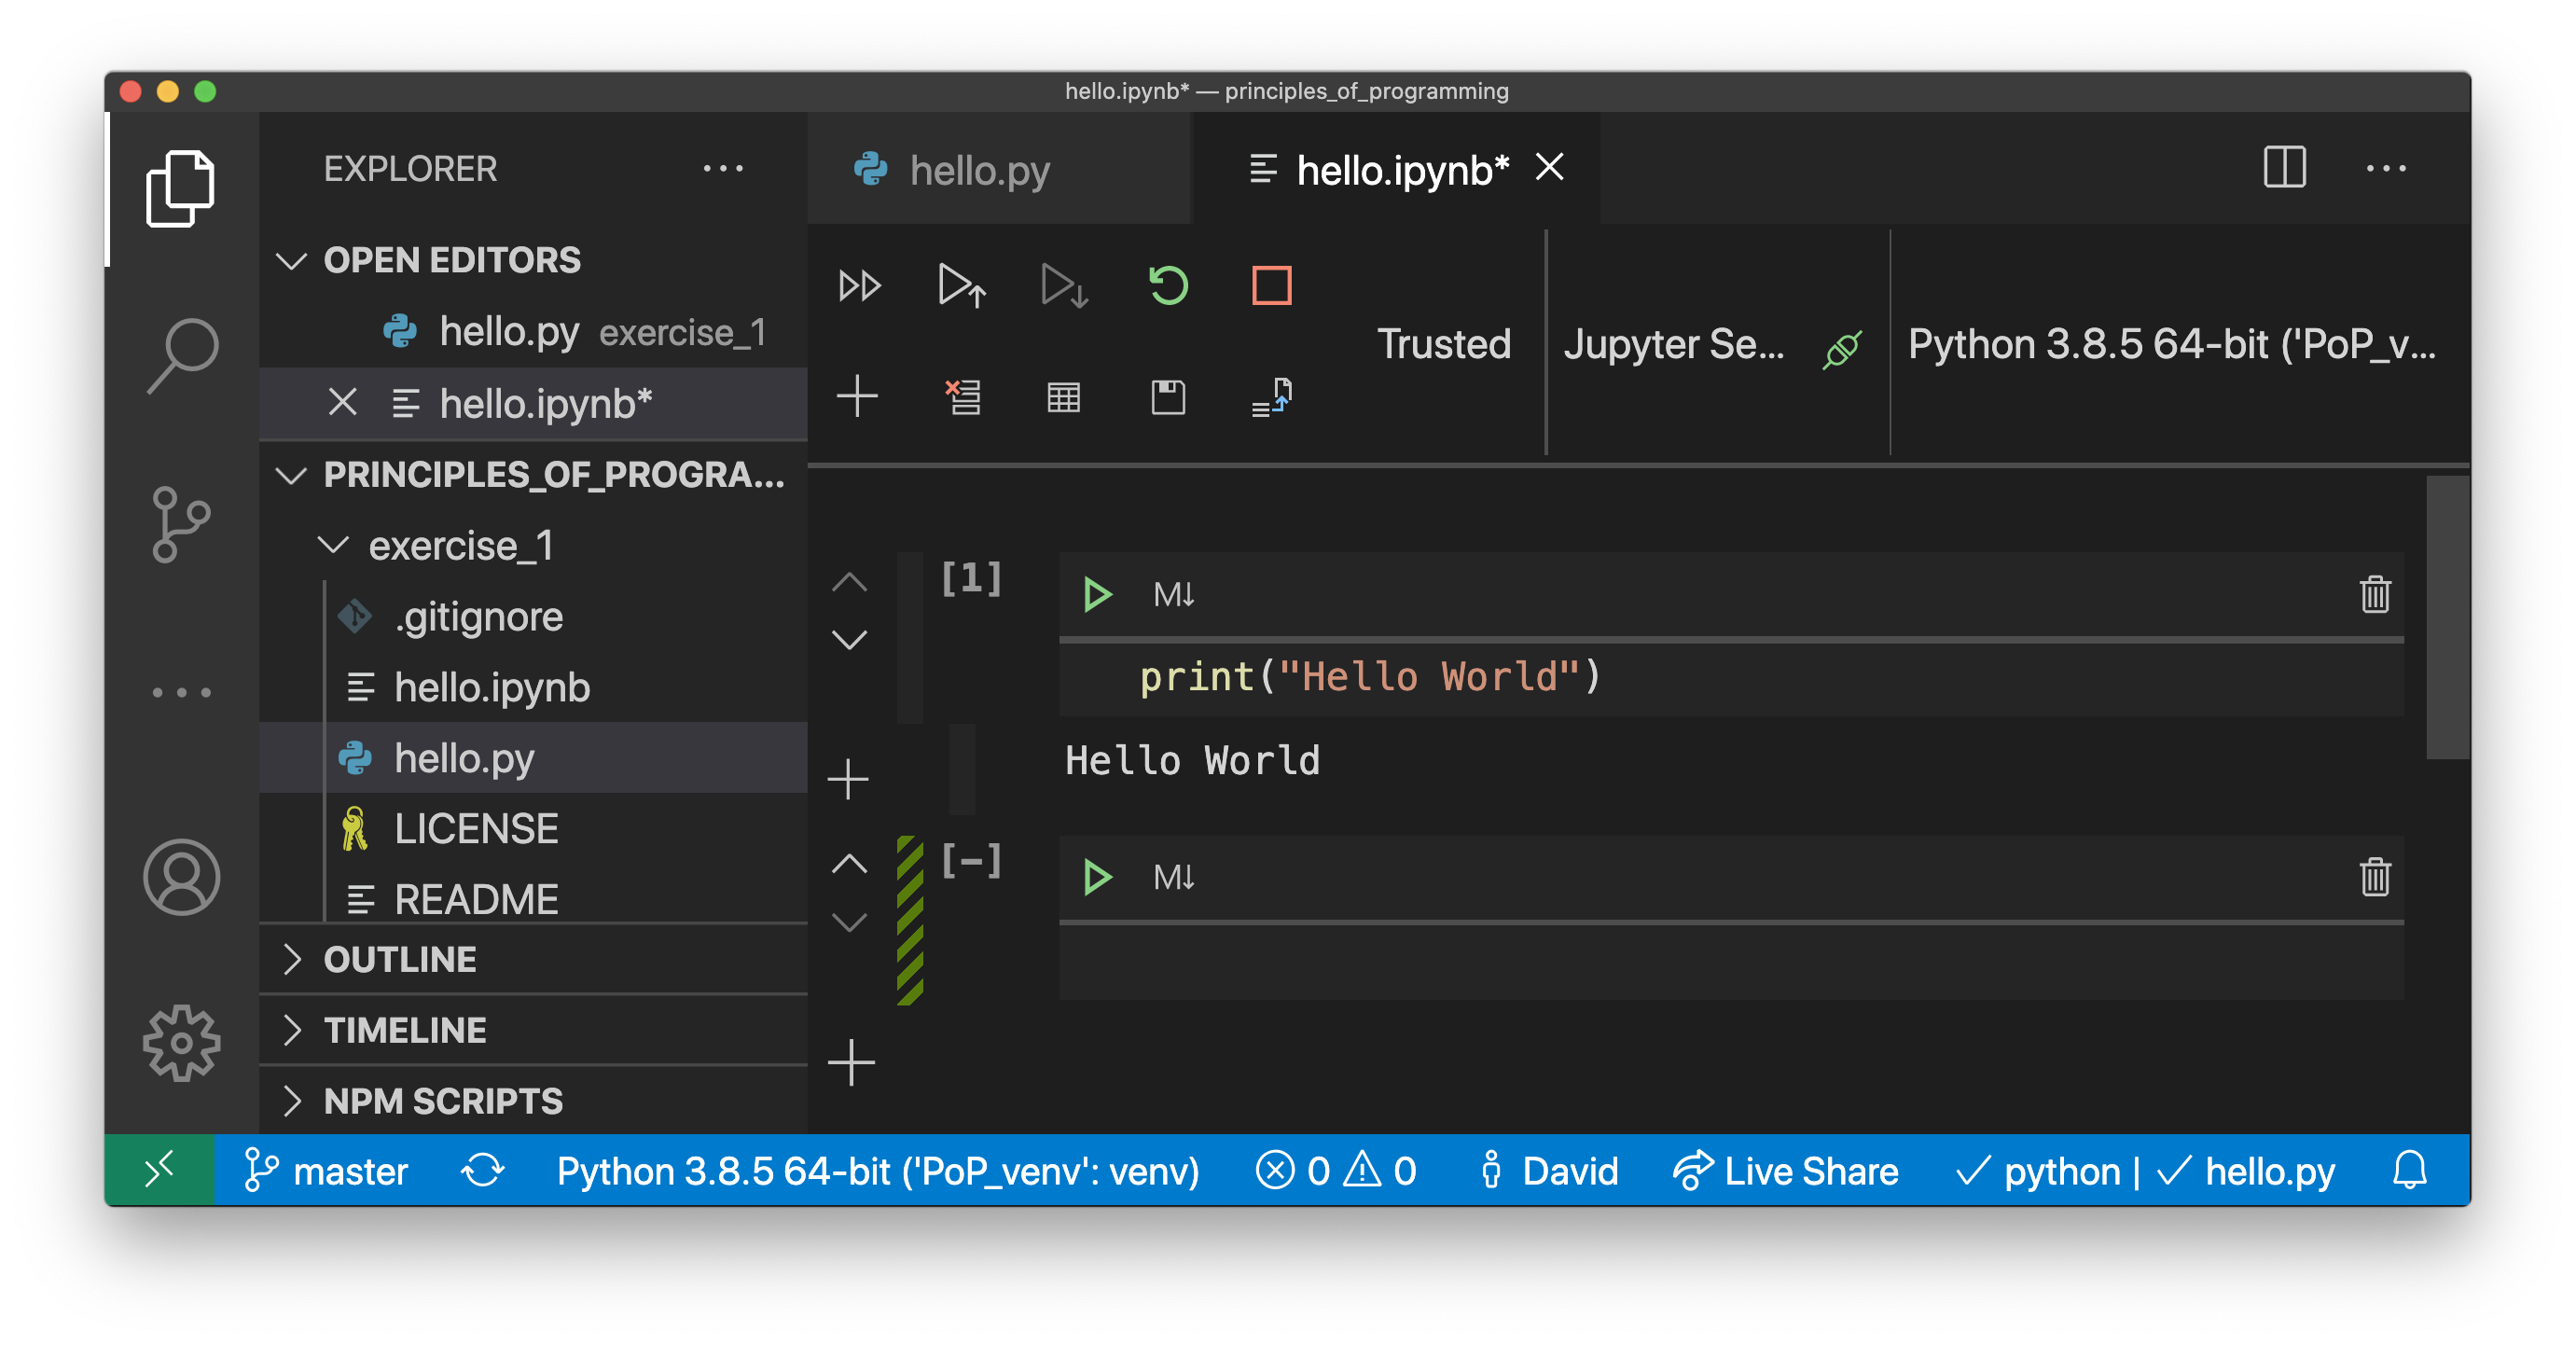
If you’re used to Jupyter notebooks opening in your web browser, then this may look a bit strange, but it’s actually just the same interface, albeit in slightly unfamiliar colours. Clicking on the green triangle, or clicking in the code box and pressing shift + enter will run the code:
Footnotes
- 1
To use these installation instructions for Chrome OS you first need to set up Linux on your Chromebook.