
4. Git and GitHub Classroom
4.1. Introduction
Git and GitHub Classroom are used in some modules to distribute programming coursework, enable you to manage your code while completing the exercises, and then to help with submission.
Note
This introduction just provides enough information to enable you to set up and use Git and GitHub Classroom for your coursework. For a more in-depth introduction to Git and GitHub, you are encouraged to work through the excellent Git tutorial provided by the Software Carpentry project.
4.1.1. What is Git?
When we’re writing code, we typically don’t just type it out, notice that it works, and stop. Instead, the usual cycle looks a bit more like this:
Write a small piece of code.
Use it to run some test problems to see if it works.
If there were problems, make a change and go back to step 2.
Once it’s working, go back to step 1 and write the next small piece of code.
Each time we get to step 4, we’re a little closer to having a working program that does what we want. However, each time we go back through steps 1-3, we run the risk that we don’t just implement a new feature, but that in doing so we break something we already had working. How do we make sure that we always know exactly what the code used to look like when it worked?
One answer is to keep saving old versions under different names. This is a bad answer for two reasons. The first is that it swiftly descends into a confused mess, as anyone who has ever been emailed a Word file named report_draft_final_revised2_johns_comments.doc can attest! The second is that the names of files and code objects often matter to programming languages - so the mere action of saving your code under a different name can stop it working.
The right answer to the problems caused by constantly updating code (or any other document) is a version control system. A version control system is a piece of software which keeps track of versions of a collection of files such as a software project. A well-used revision control system can tell you:
What changed in the files.
When the change happened.
Who made the changes.
Revision control systems also help with the edit conflicts that can occur when more than one person edits a file, for example as a part of a group project - or even when you edit the same file on two different computers.
Git is one such revision control system, and it’s one of the most capable and widely used currently available.
4.1.2. What is GitHub?
Git keeps track of a collection of files stored in a project folder called a repository which is kept on your computer. That’s great but what if you want to do any of the following?
Collaborate with someone else who also needs to edit the files.
Work on more than one computer.
Still have your repository if your computer is lost or your hard disk dies.
GitHub is a cloud service which stores copies of Git repositories online. You can push your changes up to GitHub from any computer with an internet connection and pull those changes down to any other computer. GitHub also integrates with other software development tools such as automatic testing frameworks, issue trackers and code review to provide a comprehensive software development platform. Depending on the module you are taking, you may also use some of these extra features of GitHub, but we will mostly focus on how to use the core feature of storing a copy of your repository online.
4.1.3. What is GitHub Classroom?
All of the collaborative features of Git and GitHub might sound like overkill when all you need to do is complete coding assignments that only you work on. However in software development terms, you always have at least one collaborator on your assignments: the module lecturer. Usually the lecturer provides some initial skeleton code, such as some incomplete source files or Jupyter notebooks. During the course of the work, you might need to show your code to the lecturer or a teaching assistant in order to get help, and at the end you need to share your work with the module staff to get it marked.
GitHub Classroom is a service that works with GitHub to provide every student doing a particular coding exercise with their own repository on GitHub that’s prepopulated with the lecturer’s skeleton code and ready to work with. As we’ll see below, this makes it really easy to obtain the exercise and work with it.
4.2. Installing Git on Windows
4.2.1. Direct download
To install Git directly, navigate to the Git Windows download website. If the download doesn’t start immediately, click on Click here to download manually. Run the installer. Unless you have specific reasons to do otherwise, it’s reasonable to accept all the defaults by clicking next each time.
Now proceed to check the install.
4.2.2. Software Hub
Follow the instructions on the Imperial Software Hub website.
The version of Git on Software Hub is somewhat older and has compatibility issues with the most recent versions of Visual Studio Code.
Now proceed to check the install.
4.3. Installing Git on Mac
All recent versions of MacOS come with Git pre-installed. This version is likely to be good enough for many students on many modules, though it probably won’t be the most recent release.
If you want a more recent version and you’ve installed Homebrew then installing Git is as simple as opening a terminal and running the following command:
$ brew install git
Now proceed to check the install.
If you need a more recent version of Git and you don’t want to install Homebrew for whatever reason, then there are more options on the Git MacOS download website.
4.4. Installing Git on Linux or Chrome OS 1
Every Linux distribution ships Git through its package manager. The easiest way to install Git is usually to simply do whatever it is that is normal on your distribution to install software. For example on Ubuntu or any other Debian-based system you would run this in the terminal:
$ sudo apt-get install git
While on Fedora and related distributions, you would run:
$ sudo dnf install git
or if you’re using an older version of these distributions:
$ sudo yum install git
If you’re using a different Linux distribution then you’ll probably find the correct install line on the Git Linux download website.
4.5. Check the install
Check that you’ve got a successfully working Git by running this in the Opening a terminal:
$ git --version
The expected output is something like:
git version 2.28.0
The exact version may be a little different. This is not important.
Proceed now to configure Git.
4.6. Configuring Git
Git needs a little bit of configuration to work smoothly. This configuration belongs to the computer you’re running Git on, so you don’t have to do this for each project, but you do have to do it for each computer you log into. If you’re using Imperial’s lab machines remotely, these all share user home directories so you should not need to redo the Git configuration each time you log into a new lab machine: one configuration is enough for them all.
4.6.1. Your details
First you need to tell Git about your name and email address. This has nothing directly to do with the information you provided to GitHub, instead it will just be used by Git to label you as the author of the code that you write. To save on a great deal of confusion later, you should register the actual name that you usually go by. Similarly, please use your Imperial email address. Open a terminal and run the following commands, replacing your name as appropriate:
$ git config --global user.name "Jo Student"
$ git config --global user.email "Jo.Student20@imperial.ac.uk"
4.6.2. Line endings
When a text file, such as a program source file, contains a line break, this is represented by a special invisible character. Unfortunately, it’s not the same character on different operating systems, which can make a bit of a mess when a file is created on one operating system, and then edited on another - such as might happen if your lecturer uses a different operating system for you. We can set up Git to automatically clean up this mess in most cases.
4.6.2.1. Windows
Run the following command in the Git Bash terminal:
$ git config --global core.autocrlf true
4.6.2.2. MacOS or Linux
Run the following command in the terminal:
$ git config --global core.autocrlf input
4.6.3. Text editor
Git sometimes needs you to write a text comment. When this is the case, it will launch a text editor to enable you to type the comment in. If you don’t have strong preferences for a particular editor, then nano is a good choice, so run the following line in the terminal:
$ git config --global core.editor "nano -w"
If you have a favourite text editor, you can set it using the Software Carpentry instructions.
4.7. Signing up to GitHub
You will need your own GitHub account. This is completely separate from your Imperial College computer account so you need to sign up separately. If you’ve already got a GitHub account then you don’t need another one. Assuming you don’t already have an account, click on the GitHub signup page.
There are three fields to fill out:
- Username
You can use any name that is not already taken on GitHub. It doesn’t need to have any relationship to your Imperial account name.
- Email Address
You need to use a real email address that works and you have access to, as GitHub will send you a verification email which you need to respond to. It is a very good idea to use your Imperial email address as this will make it easier to sign up for a GitHub Student Developer Pack (see below).
- Password
Choose a good, secure password. Do not use the same password as you use for your Imperial computer account.
4.7.1. Obtaining the GitHub Student Developer Pack
GitHub provide upgraded “pro” accounts and a bundle of other online tools for free to students. You don’t need this for your Imperial modules, but some of it may be nice to have if you intend to do more software development as a student. You can register for the Student Developer Pack here. Part of the registration is to verify your student status, and one of the things that GitHub uses for this is your email address so if you didn’t use your Imperial email address to register your GitHub account, you might want to add your Imperial email address to your GitHub account.
4.8. Doing coursework using GitHub Classroom
Some modules use GitHub Classroom to distribute, manage, and submit computational coursework. This is a trivial example which shows you how to obtain and work with Git and GitHub to do your coursework.
4.8.1. Accepting the assignment
For each GitHub Classroom assignment, your module will provide access to a link that you can use to accept the assignment. In this case, there is a tiny toy assignment created just for this exercise. Accept the assignment by clicking here.
When you click on the assignment, if you’re not already logged into your GitHub account then you will be prompted to do so. If this is your first GitHub Classroom assignment, you’ll also be asked to give GitHub Classroom permission to access your GitHub account. You should do so.
You will now be asked to accept the assignment. Do so by clicking on the large green button. GitHub Classroom will now create a new repository containing your personal copy of the assignment. You can click on the link provided to navigate to your new GitHub repository. You will also receive an email inviting you to this repository. Depending on which module you are taking, the repository might be in a GitHub organisation which uses Imperial’s authentication system. If it does, then you’ll be redirected to Imperial’s login page and you’ll need to enter your Imperial (not GitHub) username and password.
If we scroll down on the front page of the GitHub repository website, we see the README file for the repository. In this case, this gives us the instructions for the assignment. Depending on the module, the instructions might be somewhere else, such as on a module website or on Blackboard. This time, we see this:
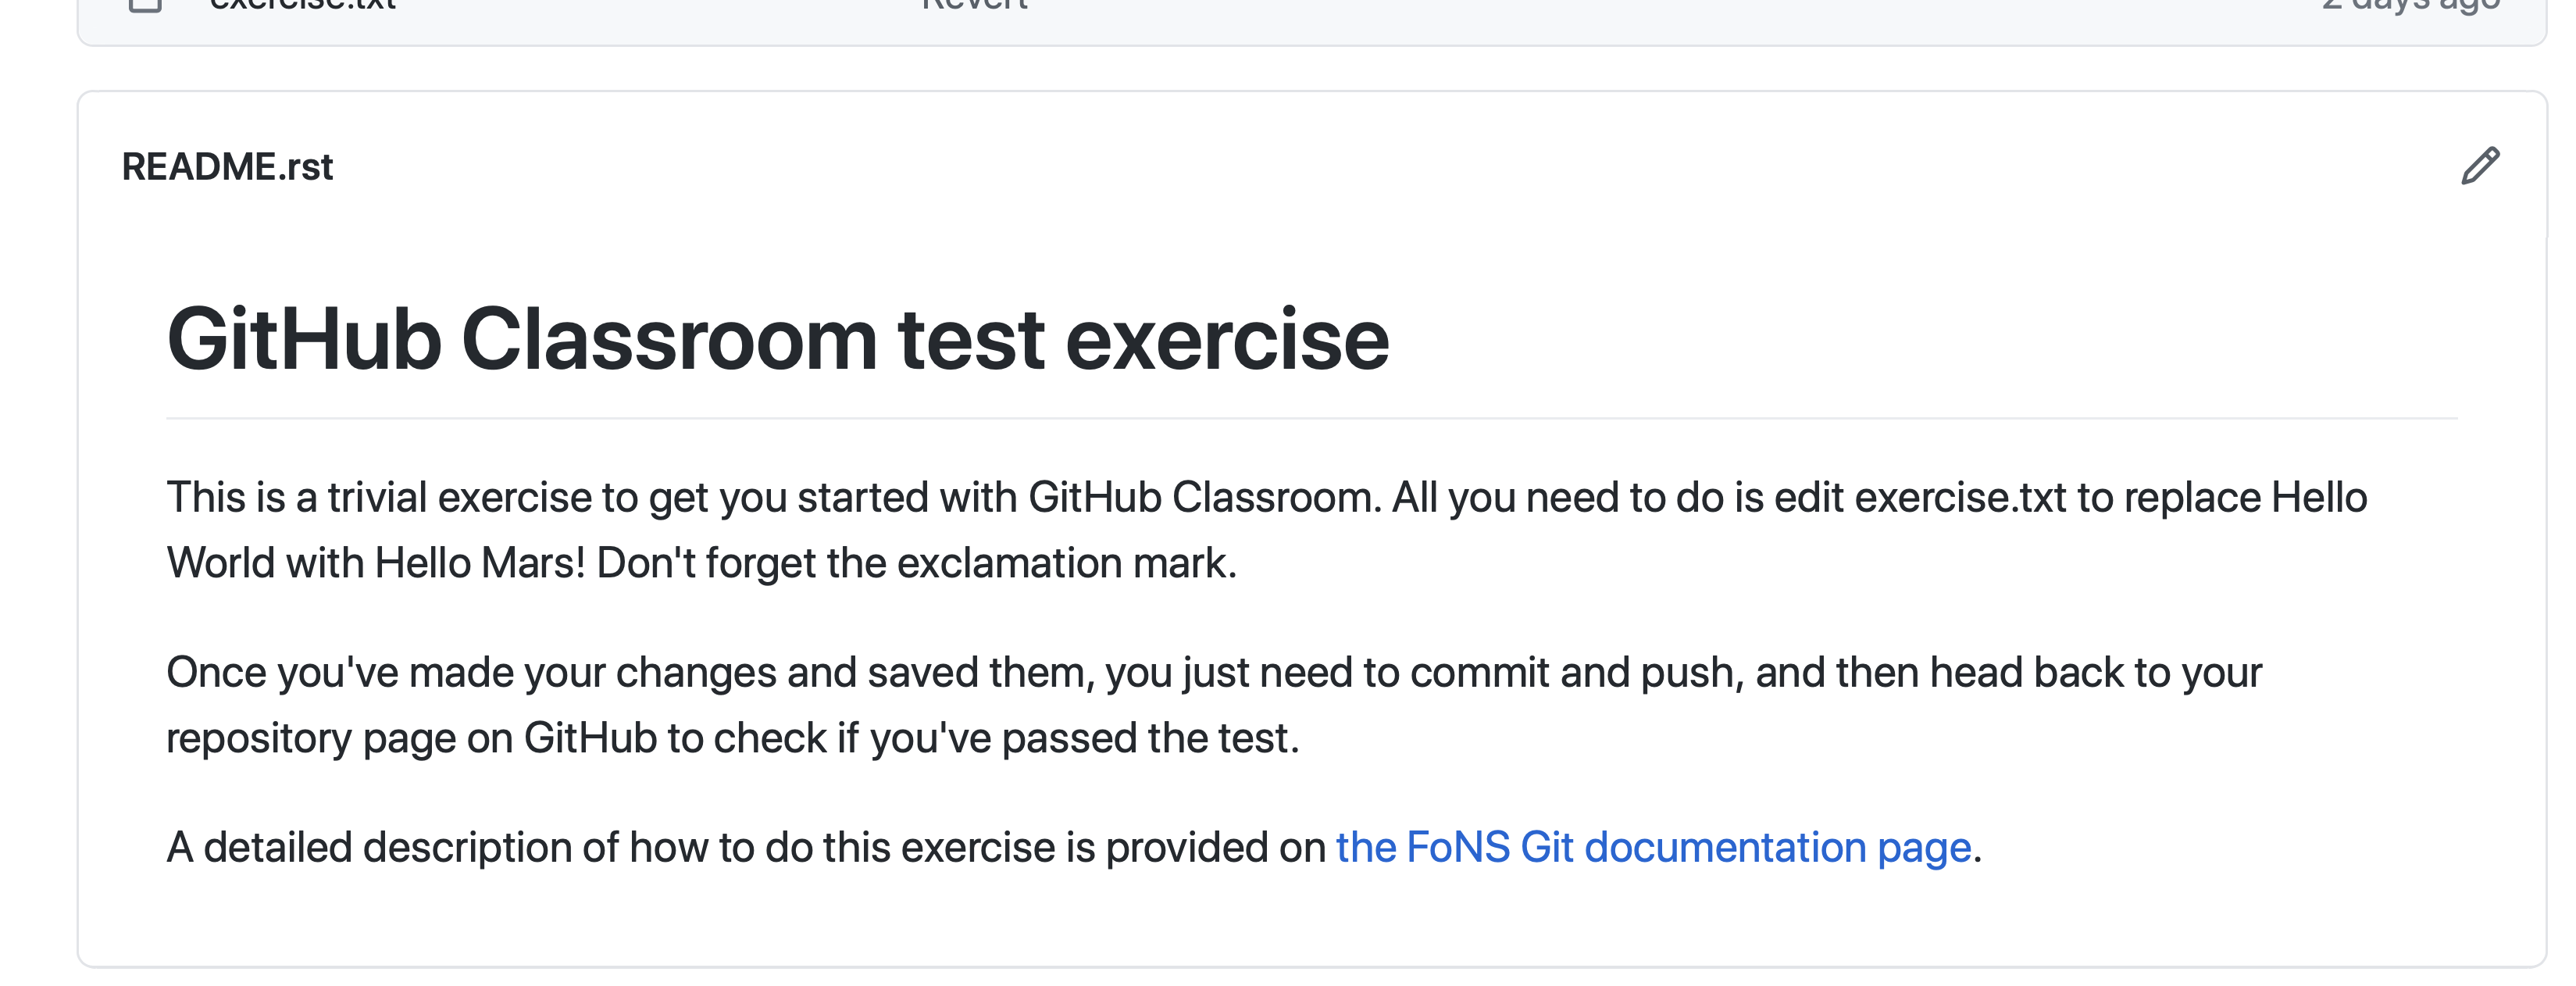
So what we have to do is:
Edit exercise.txt to replace “Hello World” with “Hello Mars!”
Commit this change.
Push the result to GitHub.
We’ll go through each of these steps and what they mean below. First, though, we’ll need to clone the repository to our computer.
4.8.2. Cloning the repository
Your new repository currently exists only on GitHub, but you need a local copy on your machine (or on a remote machine that you’re logged into) in order to work on it. This is called cloning the repository. Here we show how to do this using commands in the terminal, because this approach is the most likely to be available on all systems. So, start by opening a terminal.
Next, you will need the URL of your GitHub repository. On the repository webpage, click on the large green Code button on the right:
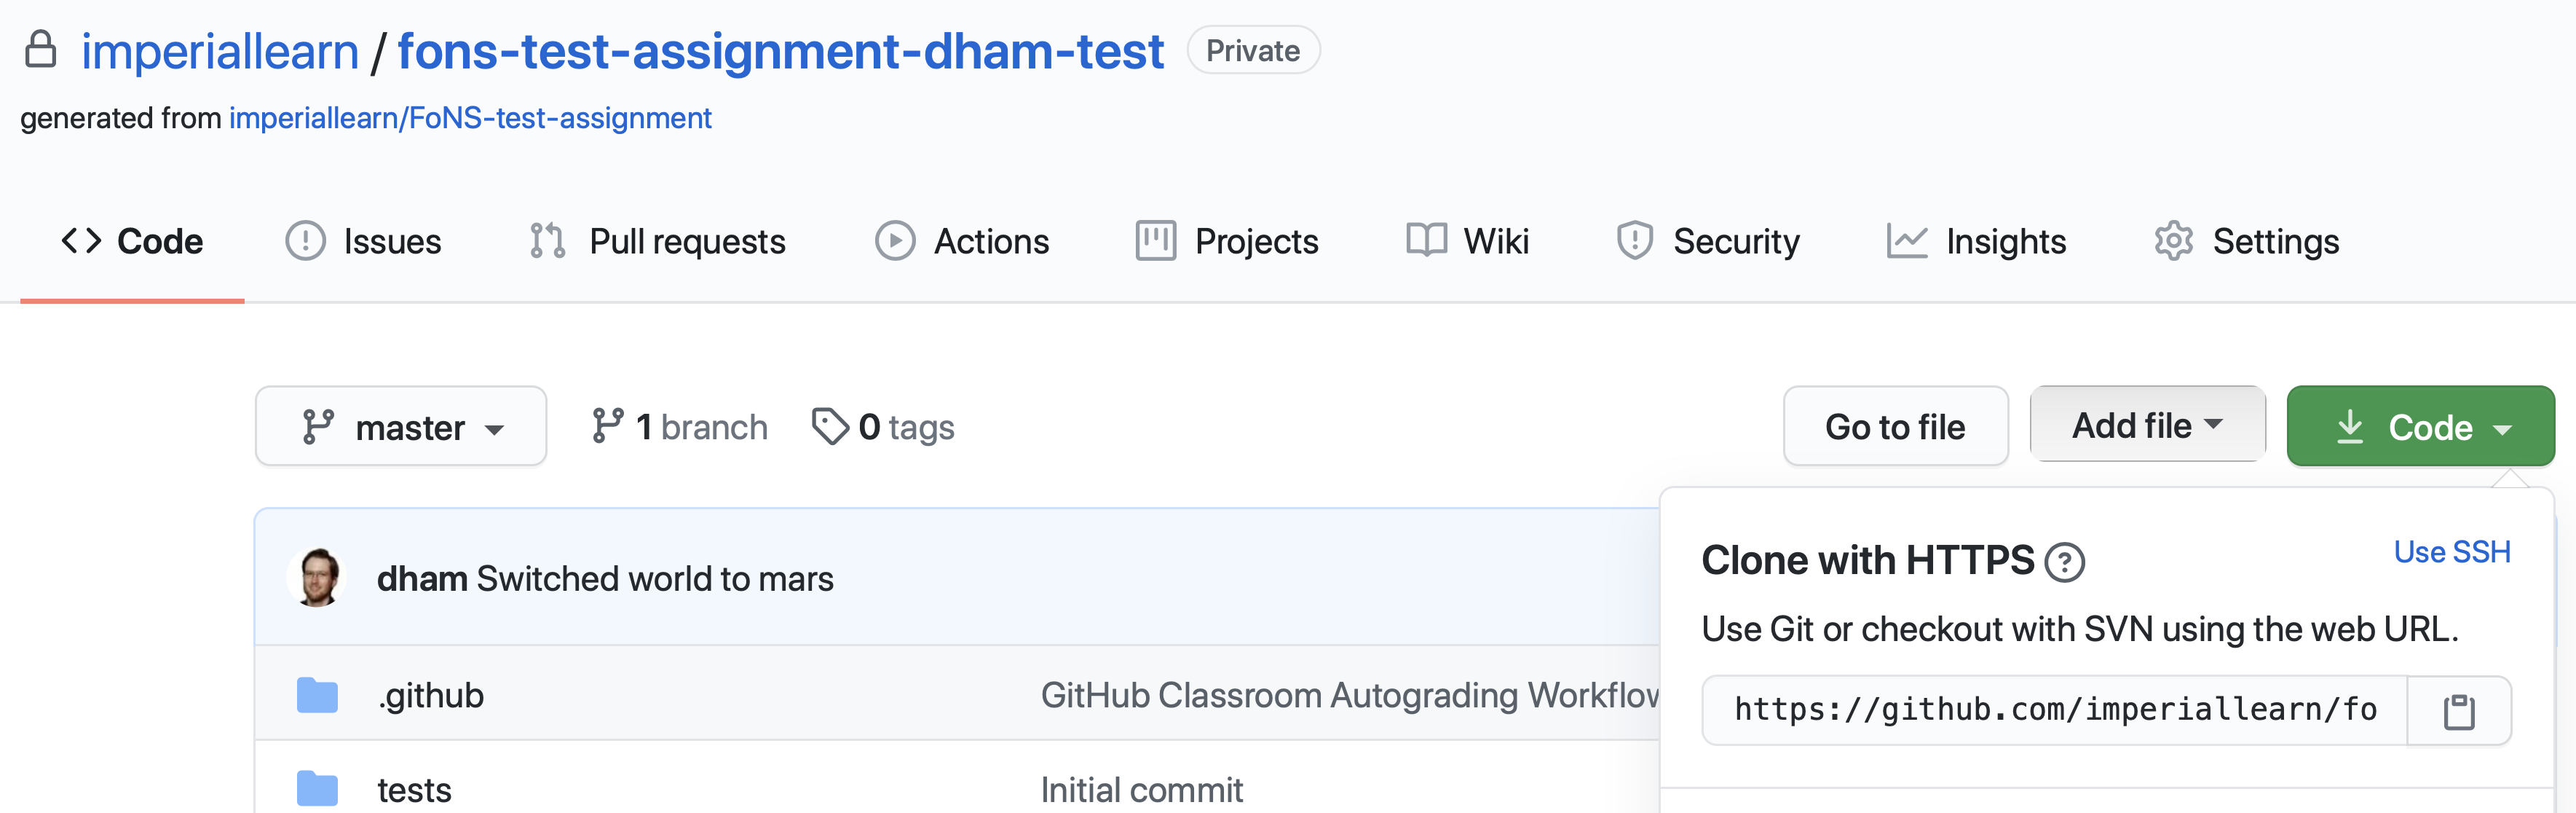
Click on the little picture of a clipboard to copy the URL. Now, back in your terminal type (without pressing enter):
$ git clone
Paste the URL you copied into the terminal after clone and then press enter. If you are asked for your GitHub username and password, enter them, and the repository will download. The process should look a little like this:
$ git clone https://github.com/imperiallearn/fons-test-assignment-dham-test.git
Cloning into 'fons-test-assignment-dham-test'...
remote: Enumerating objects: 24, done.
remote: Counting objects: 100% (24/24), done.
remote: Compressing objects: 100% (18/18), done.
remote: Total 24 (delta 5), reused 5 (delta 0), pack-reused 0
Unpacking objects: 100$ (24/24), 4.04 KiB | 172.00 KiB/s, done.
$
This will create a new folder in the current folder containing the repository. The folder will have the same name as the repository on GitHub, so in this case it’s called fons-test-assignment-dham-test. The command to change the current folder is cd (for “change directory”) so we now change into our repository:
$ cd fons-test-assignment-dham-test
We can now check that we’re in the folder we think we’re in by running the command pwd (“print working directory”):
$ pwd
$ /Users/dham/fons-test-assignment-dham-test
This shows me that we’re in the fons-test-assignment-dham-test folder in my user folder (/Users/dham), which is what I expect.
4.8.3. Editing exercise.txt
I can now check out what’s in this folder with the ls command (for “list”):
$ ls
LICENSE             README.rst      exercise.txt    tests
There are four files or folders here, one of which is exercise.txt, which is the one I need to edit. I could use any text editor for this purpose, for example if I have Visual Studio Code installed then this would be a very suitable editor. However here we’ll only assume that you’ve installed Git so we’ll use the very basic editor nano, which is almost certainly installed:
$ nano exercise.txt
This will open the nano editor in your terminal. You should see something like the following:
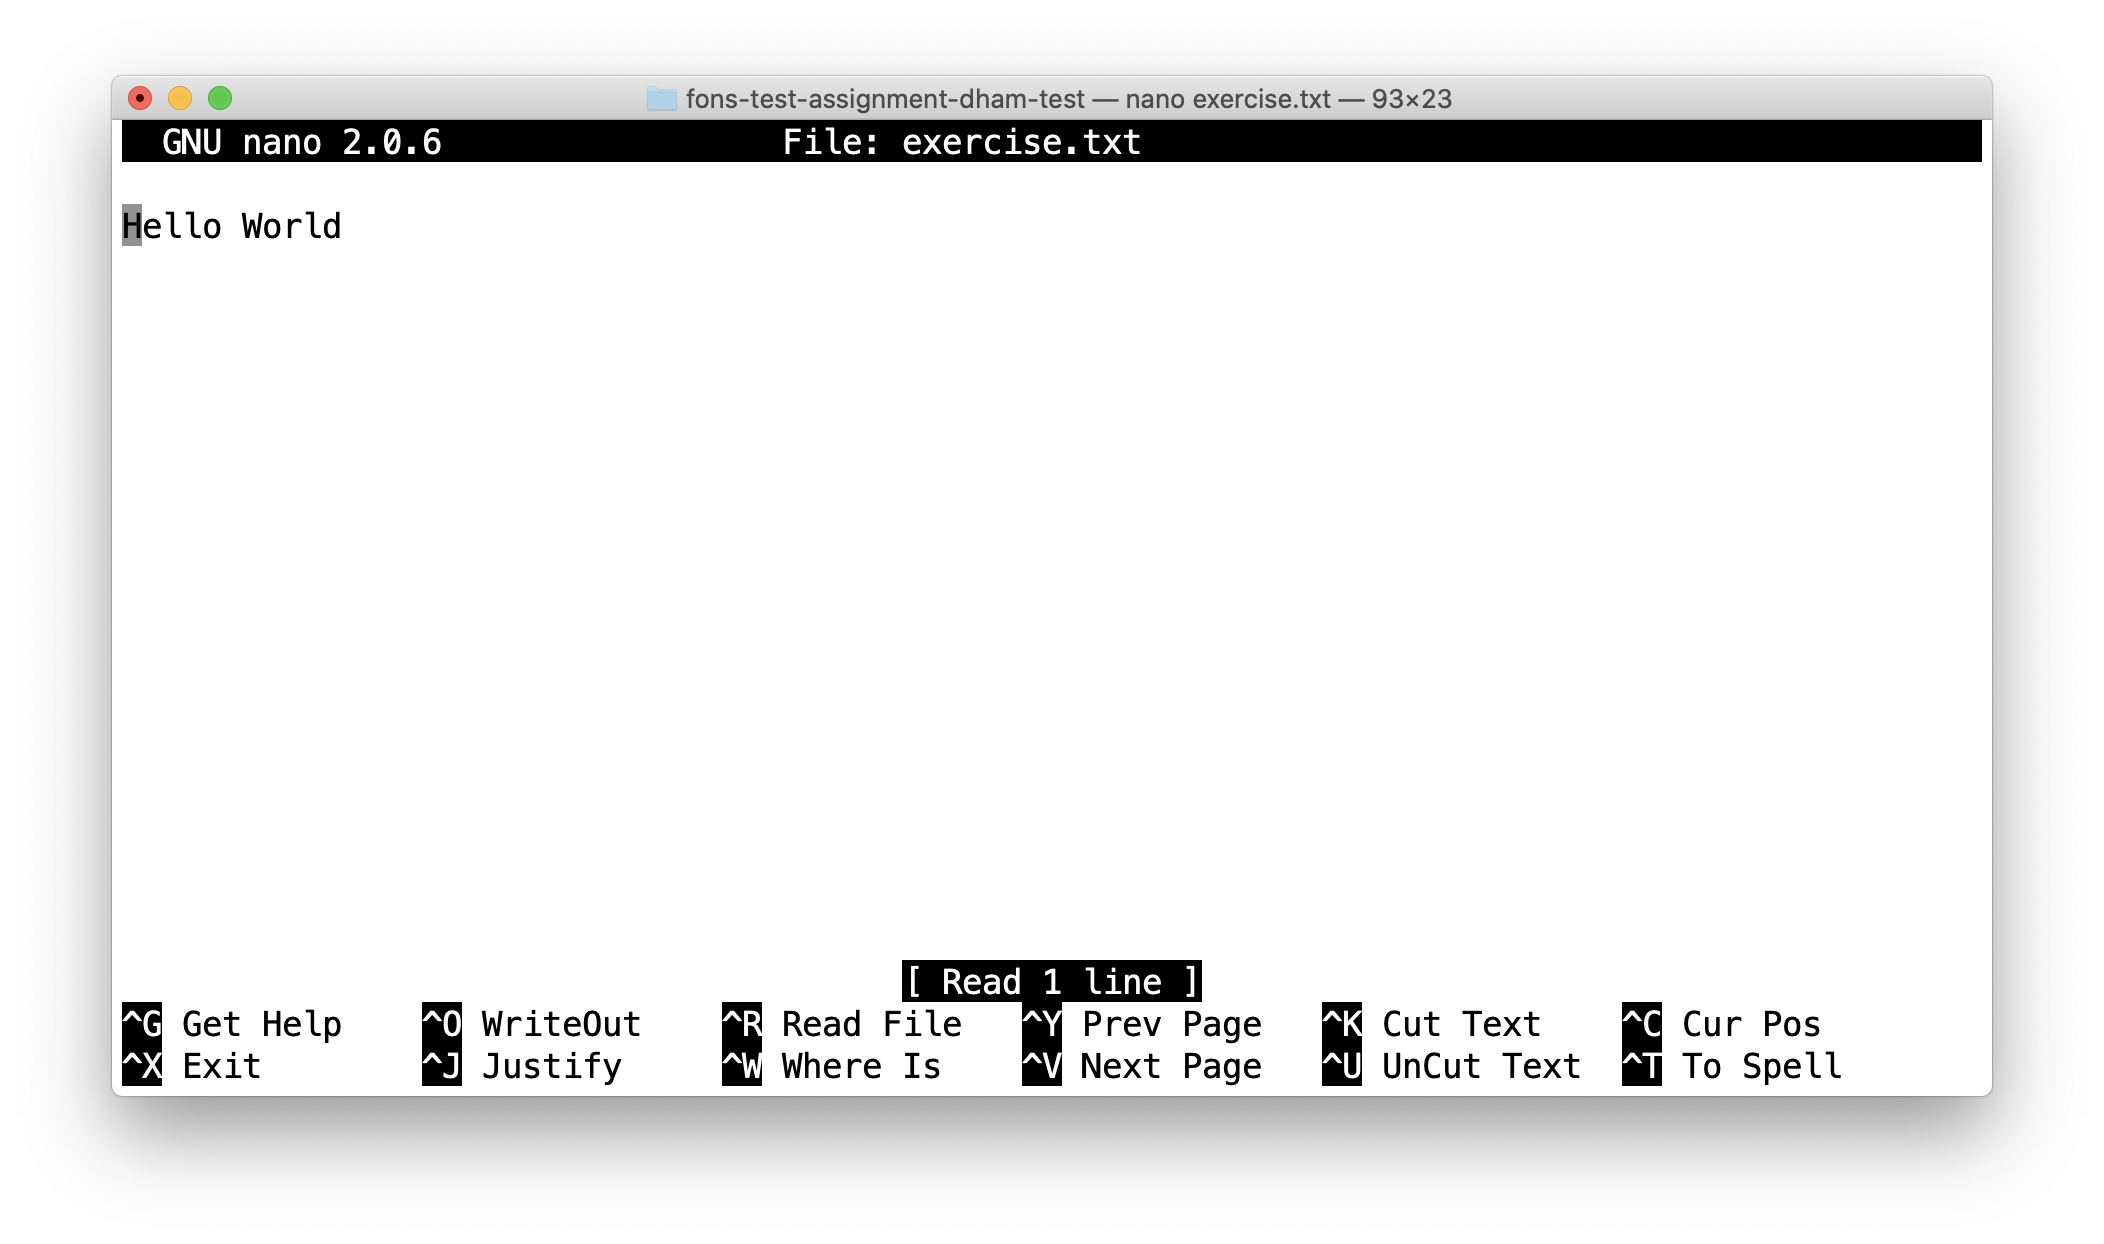
Now you can use the arrow keys and keyboard to delete “World” and replace it with “Mars!” (remember the exclamation mark!) Don’t try to move to the end of the line by clicking with the mouse, that won’t work (nano is far too basic for that!)
Once you’ve edited the line, you need to save the file and quit nano. Helpfully, nano shows a lot of its options along the bottom of the screen. We just need to know that the caret symbol (^) stands for the control key. So we press control + O to write out (save) our changes (Note for Mac users, this really does mean the control key, and not ⌘). Nano will offer us the option of changing the filename, but we don’t want to do that so we just press enter to save to the same file:

Next we quit nano by typing control + X.
4.8.4. Committing our changes
Now that we’ve changed exercise.txt, we need to tell Git to record this change. Each change (to one or many files) that we tell Git about is called a “commit” and the process is called “committing”. First, we take a look at what Git can currently see about our repository. The command for this, indeed the go to command whenever you’re not quite sure what’s going on in your Git repository, is:
$ git status
On branch master
Your branch is up to date with 'origin/master'.

Changes not staged for commit:
   (use "git add <file>..." to update what will be committed)
   (use "git restore <file>..." to discard changes in working directory)
         modified:   exercise.txt

no changes added to commit (use "git add" and/or "git commit -a")
Let’s pull this apart line by line. The first line says that we’re on the master branch. Branches are a somewhat more advanced feature, but here we only need to understand that master is the default name for the main place to store commits in a Git repository.
To understand the second line, we need to know that Git, by default, calls our repository on GitHub origin. So the second line means that, as far as Git can see, every commit that exists on our machine is also on GitHub, and vice versa.
Next comes a blank line, we’ll come back to what might appear there shortly. The next line says “Changes not staged for commit”. This means that Git can see that these files have changed or have been added, but Git has not been told that they should be committed. Git is also very helpful in telling us what we probably want to do next, so we are informed that we can tell Git that we intend to commit a file using git add, or we can undo the changes in a file back to the last committed version using git restore. Finally, Git tells us that right now there are no changes added to commit, so we either need to use git add or the shortcut version git commit -a. We’ll come back to the second of those presently, but first let’s learn about git add.
4.8.4.1. Staging files for commit
We want to commit our changes to exercise.txt, so we tell Git to add it to the list of files to be committed:
git add exercise.txt
We can check what that did by running git status:
$ git status
On branch master
Your branch is up to date with 'origin/master'.

Changes to be committed:
  (use "git restore --staged <file>..." to unstage)
    modified:   exercise.txt
The first two lines of the output are unchanged, but now we see that exercise.txt appears on the list of changes to be committed. We say that the changes are “staged” for commit. Git once again helpfully tells us that if we didn’t mean to do that then we should use the command git restore --staged to unstage the file. However, we did mean to stage exercise.txt so now we can go on to make the actual commit.
Warning
Some sites on the internet advocate the following version of git add:
$ git add -A
This is a very bad idea. What this command does is stage for commit every file in the repository that is not exactly the same as the already committed version. This can include any number of automatically generated binary files that you have generated or that your computer uses to manage the file system. Committing these files makes a complete mess of your repository and can cause conflicts if you try to clone your repository on another machine. Don’t use git add -A!
4.8.4.2. The actual commit
Having staged the file(s) for commit, we need to actually make the commit. We do this with the following command:
$ git commit -m "Changed World to Mars"
[master 7ad3846] Changed World to Mars
 1 file changed, 1 insertion(+), 1 deletion(-)
git commit tells Git to commit all staged files. Git always needs a message describing what has changed. I’ve provided this by passing the -m option followed by the commit message in quotation marks. If I were to leave off the -m option and commit message, then Git would open the text editor I configured earlier (nano) for me to enter the commit message. I would save the commit message and quit the editor, after which the commit would go ahead as above.
Let’s use our go to command, git status to see what we’ve done:
$ git status
On branch master
Your branch is ahead of 'origin/master' by 1 commit.
  (use "git push" to publish your local commits)

nothing to commit, working tree clean
This is now quite different from what we’ve seen before. We’re still on branch master, but now we’re informed that we’re ahead of origin/master by one commit. This is because we’ve made a commit locally on our machine, but we haven’t yet pushed that change up to GitHub. Git helpfully informs us that we could remedy this situation using git push. Because we’ve committed all the changes we made, we’re also informed that there is nothing more to commit.
Before we proceed to pushing our changes to GitHub, we’ll take a look at a quicker way to stage and commit changes in a single command.
4.8.4.3. Stage and commit in a single command
Most of the time, you will make changes to one or more files that Git already knows about. In these circumstances, there’s a shortcut command, and it’s one that Git already hinted to us about. Instead of separately running git add followed by git commit, we can use git commit -a. We still need to provide a commit message, so the equivalent to the two commands above would be:
$ git commit -am "Changed World to Mars"
[master 5a4a79c] Changed World to Mars
 1 file changed, 1 insertion(+), 1 deletion(-)
Now if we type git status, we discover we are in exactly the same state as when we type the two commands separately:
$ git status
On branch master
Your branch is ahead of 'origin/master' by 1 commit.
  (use "git push" to publish your local commits)

nothing to commit, working tree clean
4.8.4.4. Pushing changes to GitHub
The final stage in the commit process is to push the changes we have made up to GitHub:
$ git push
Enumerating objects: 5, done.
Counting objects: 100% (5/5), done.
Delta compression using up to 4 threads
Compressing objects: 100% (2/2), done.
Writing objects: 100% (3/3), 280 bytes | 35.00 KiB/s, done.
Total 3 (delta 1), reused 0 (delta 0), pack-reused 0
remote: Resolving deltas: 100% (1/1), completed with 1 local object.
To https://github.com/imperiallearn/fons-test-assignment-dham-test.git
   d91be89..5a4a79c  master -> master
Depending on your configuration, you might have to enter your GitHub username and password. The output includes quite a lot of detail that we currently don’t care about, but the last two lines tell us which GitHub repository we were pushing to, and that we pushed the local master branch to the GitHub master branch.
If we now type git status, we find that we are no longer ahead of origin/master:
$ git status
On branch master
Your branch is up to date with 'origin/master'.

nothing to commit, working tree clean
If we turn back to the repository website on GitHub, we can also see that the commit has arrived:
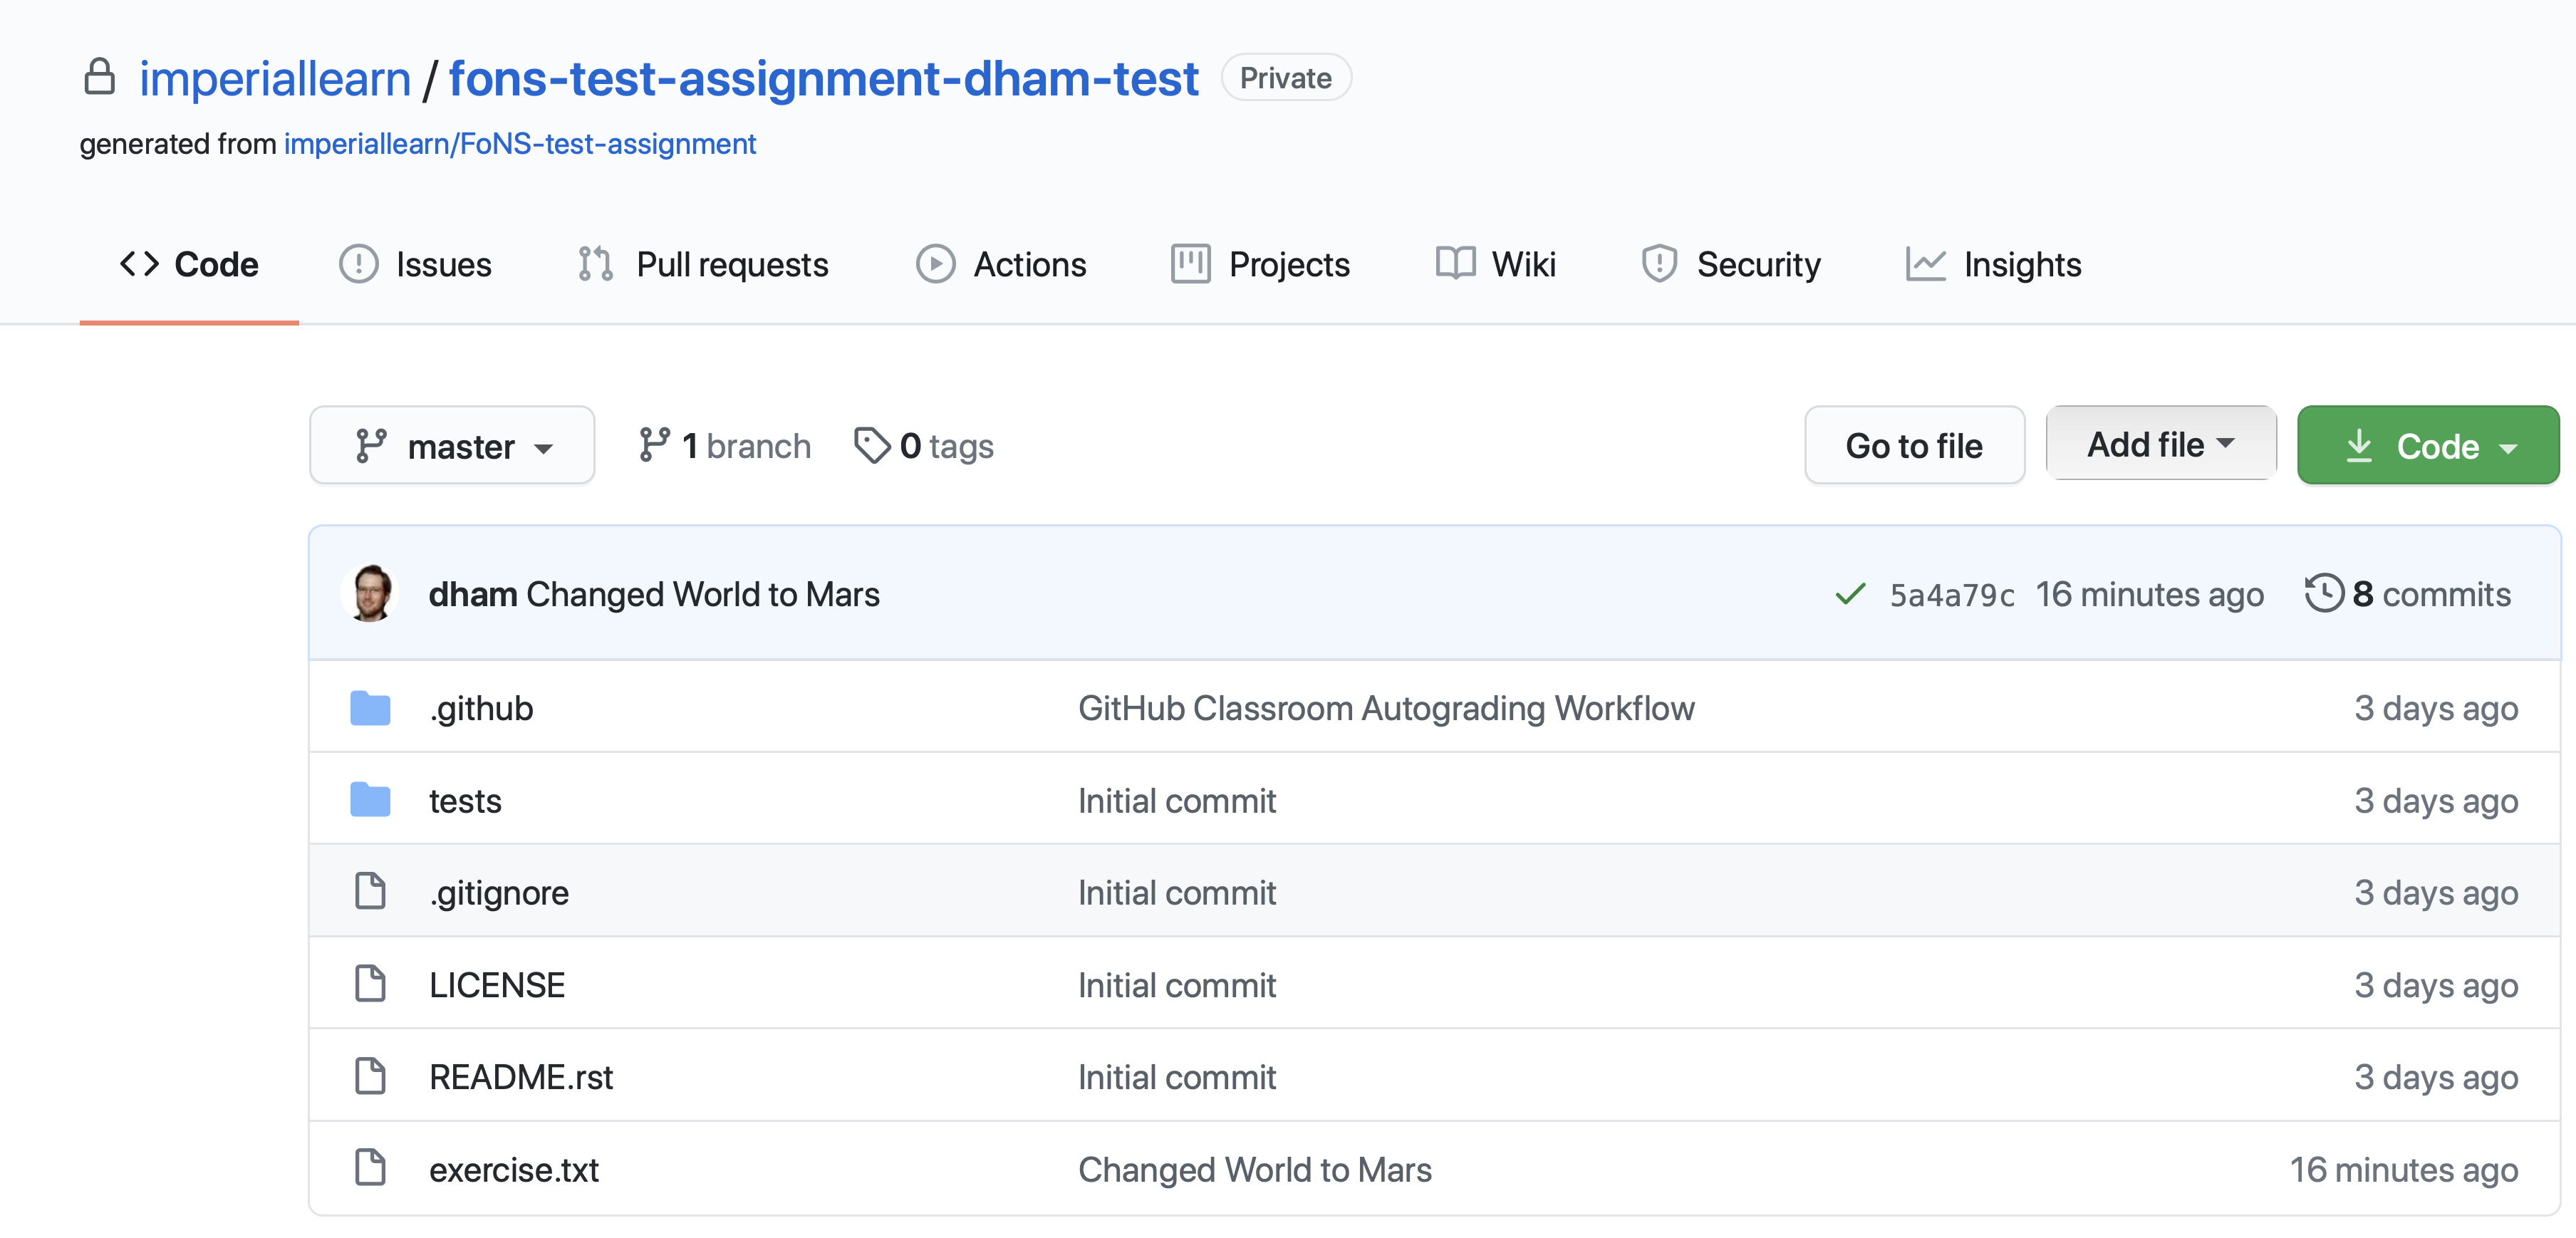
Notice that we can see the commit message both in the blue bar at the top of the file list, and next to the file that we changed. By clicking on the commits link at the right hand side of the blue bar, we can see a list of all the changes that have ever happened on the master branch of our repository:
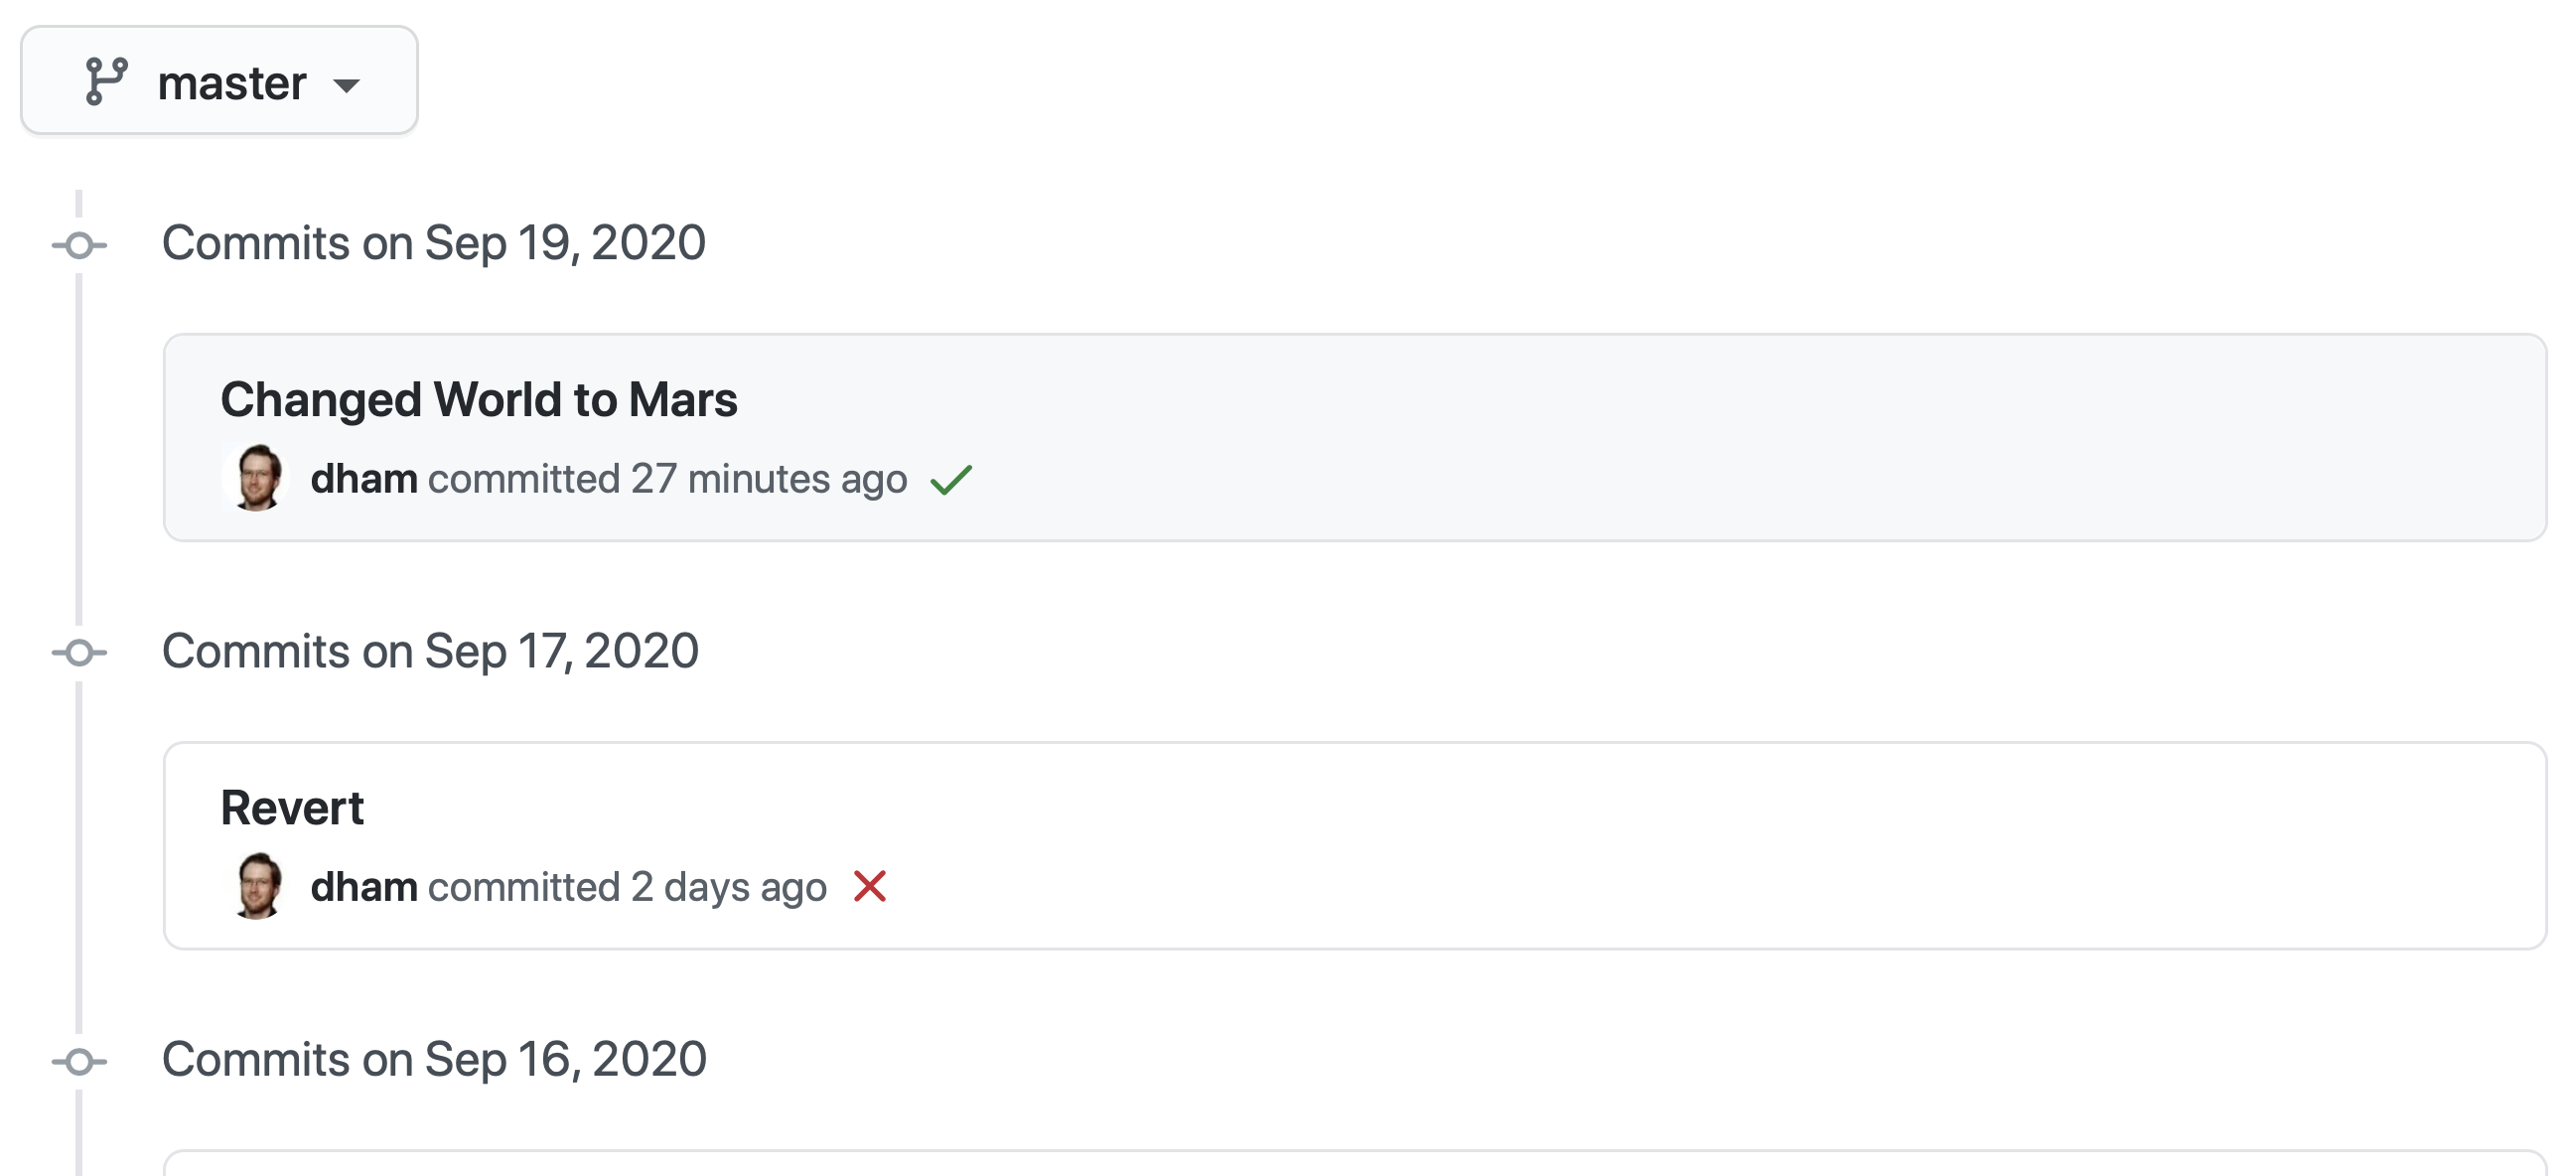
Clicking on the title of any of these commits, produces a colour-coded rendition of the exact changes that occurred at that commit. For example, if we click on the title of the commit that we just made, then we find:
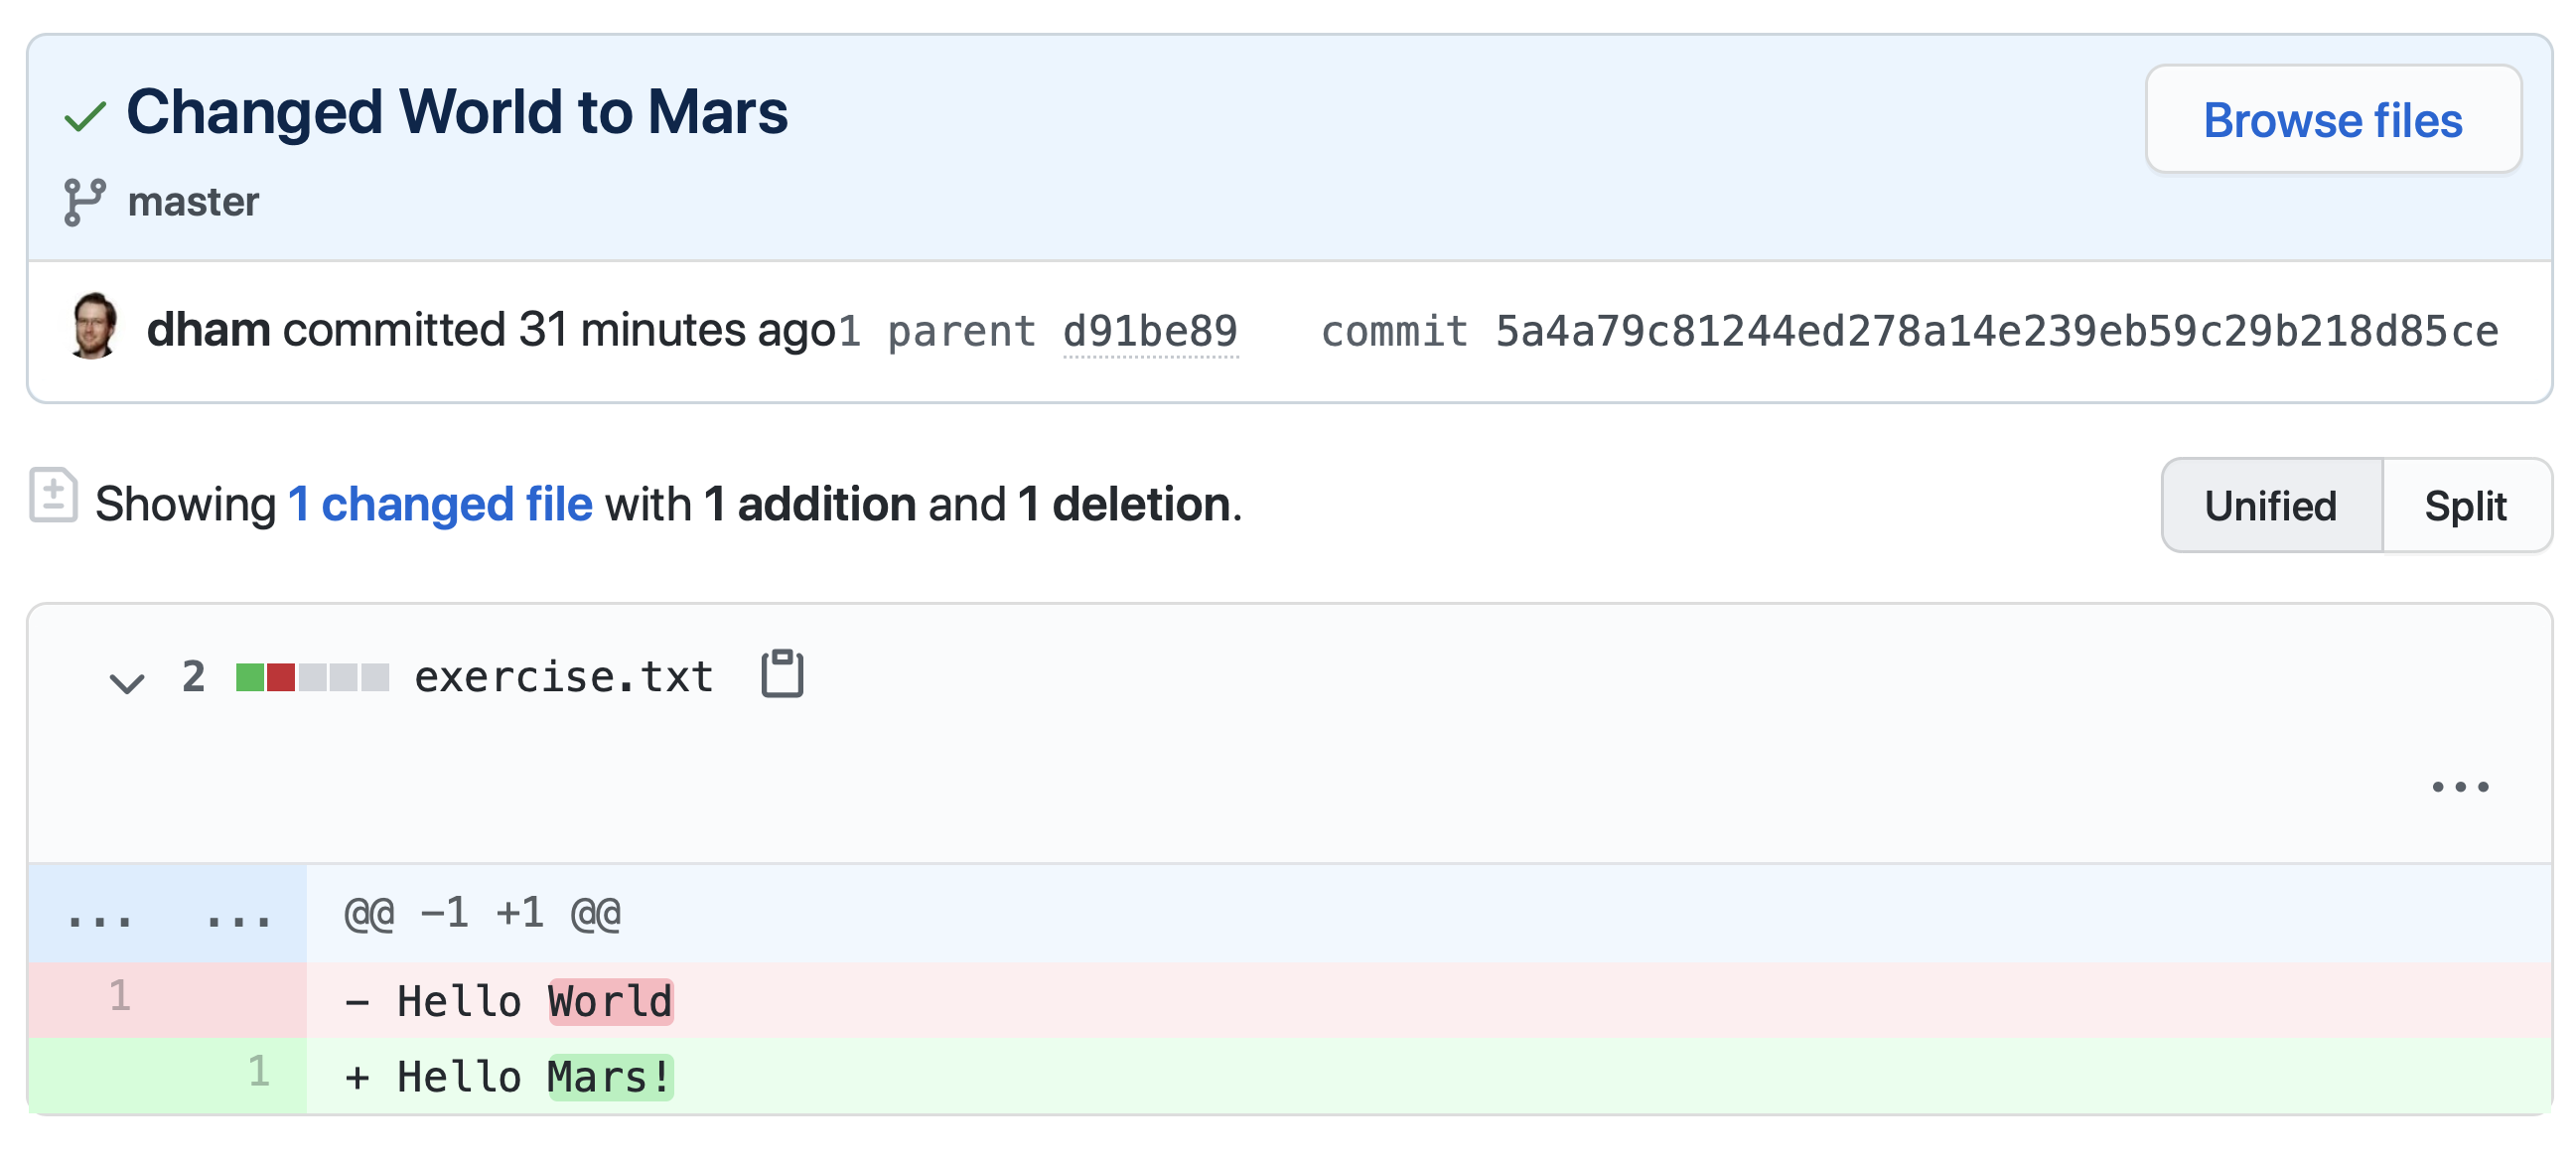
4.8.5. Reporting the commit hash
Sometimes you might need to identify a particular commit, for example to submit a piece of coursework, or to identify the particular code about which you are asking for help. Git associates a unique string of characters with each commit. This is known as the commit hash, because it’s a cryptographic hash value of the files in the commit. However it’s not important how the commit hash is computed, all that one needs to know is that the hash value is sufficient for someone else who has access to your repository to find the exact commit that you mean.
It is possible to find the hash of a commit locally, in the copy of the repository on your computer. However this is a dangerous practice, because you might not have pushed that commit to GitHub, so you risk sending someone on a wild goose chase for a commit that they will never find. It is therefore a much better idea to grab the commit hash for the commit you want directly from the GitHub web interface. The most reliable way to find the commit hash is to follow the steps above to navigate to the commit in which you are interested. The commit has his the 40 character hexadecimal number on the right: in this case 5a4a79c81244ed278a14e239eb59c29b218d85ce.
4.8.6. Autograding
Notice in the commit list above that the final (top) commit has a green tick mark next to it, while the previous commit has a red cross. These marks appear because this exercise has autograding set up in GitHub classroom. Autograding is a mechanism for automatically running tests on each commit to provide immediate feedback as to the correctness of the work. Autograding is the generic term for this sort of automated testing when applied to coursework. It doesn’t necessarily imply that you will receive marks for passing the tests. If we click on the green tick and then on details, we can see a little more information:
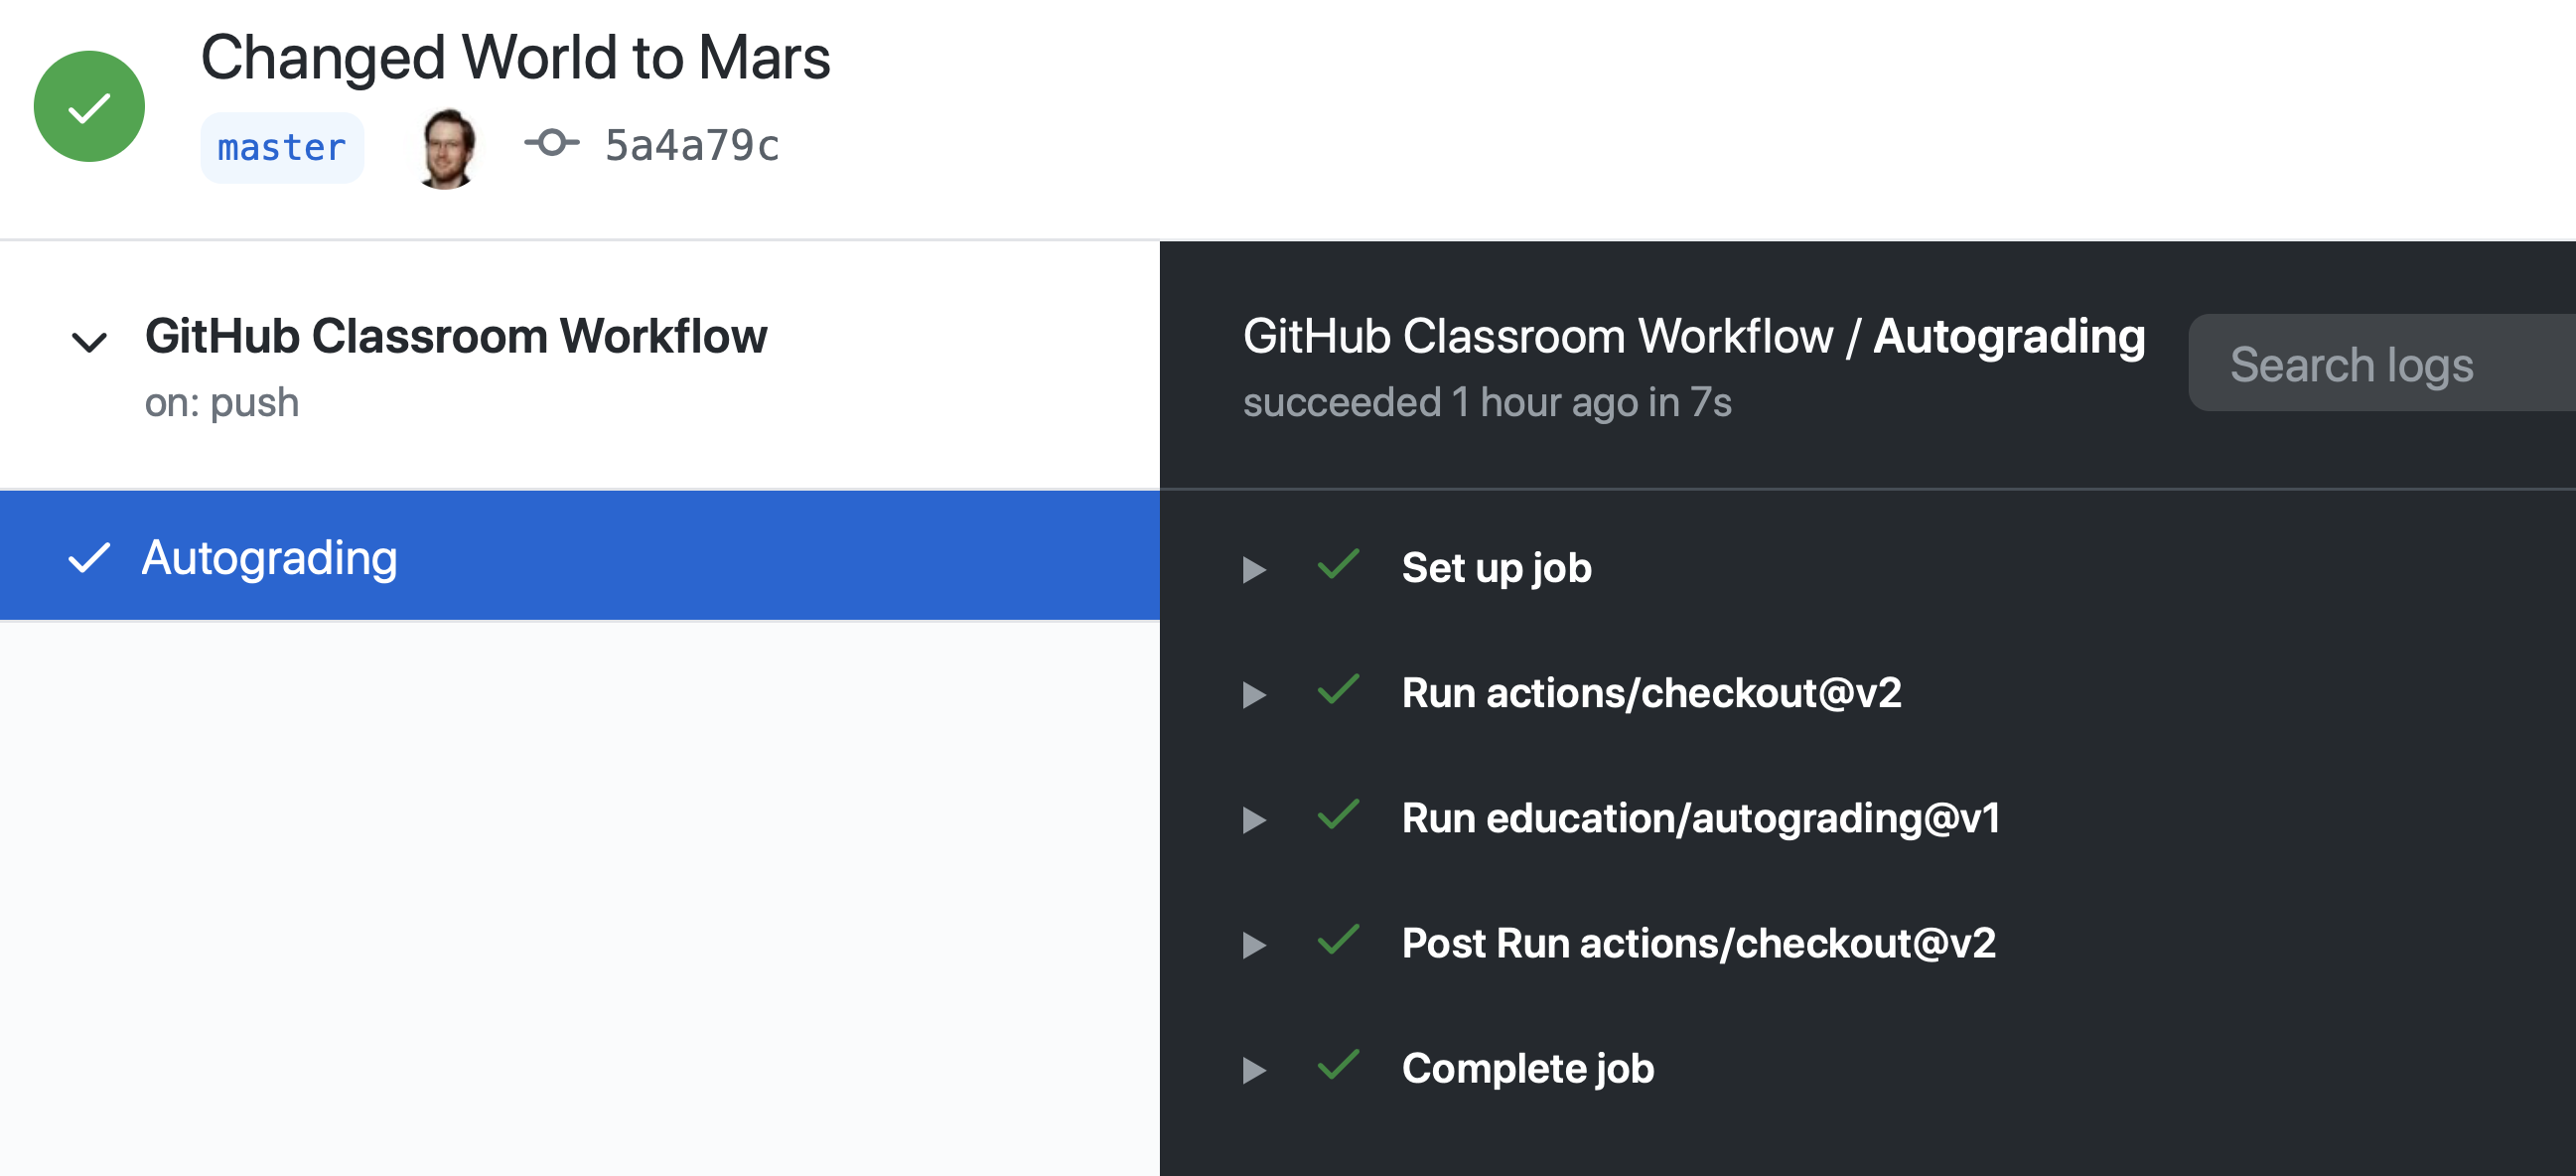
This case isn’t all that interesting, because we’re passing everything. It’s actually more interesting to go back and click on the red cross:
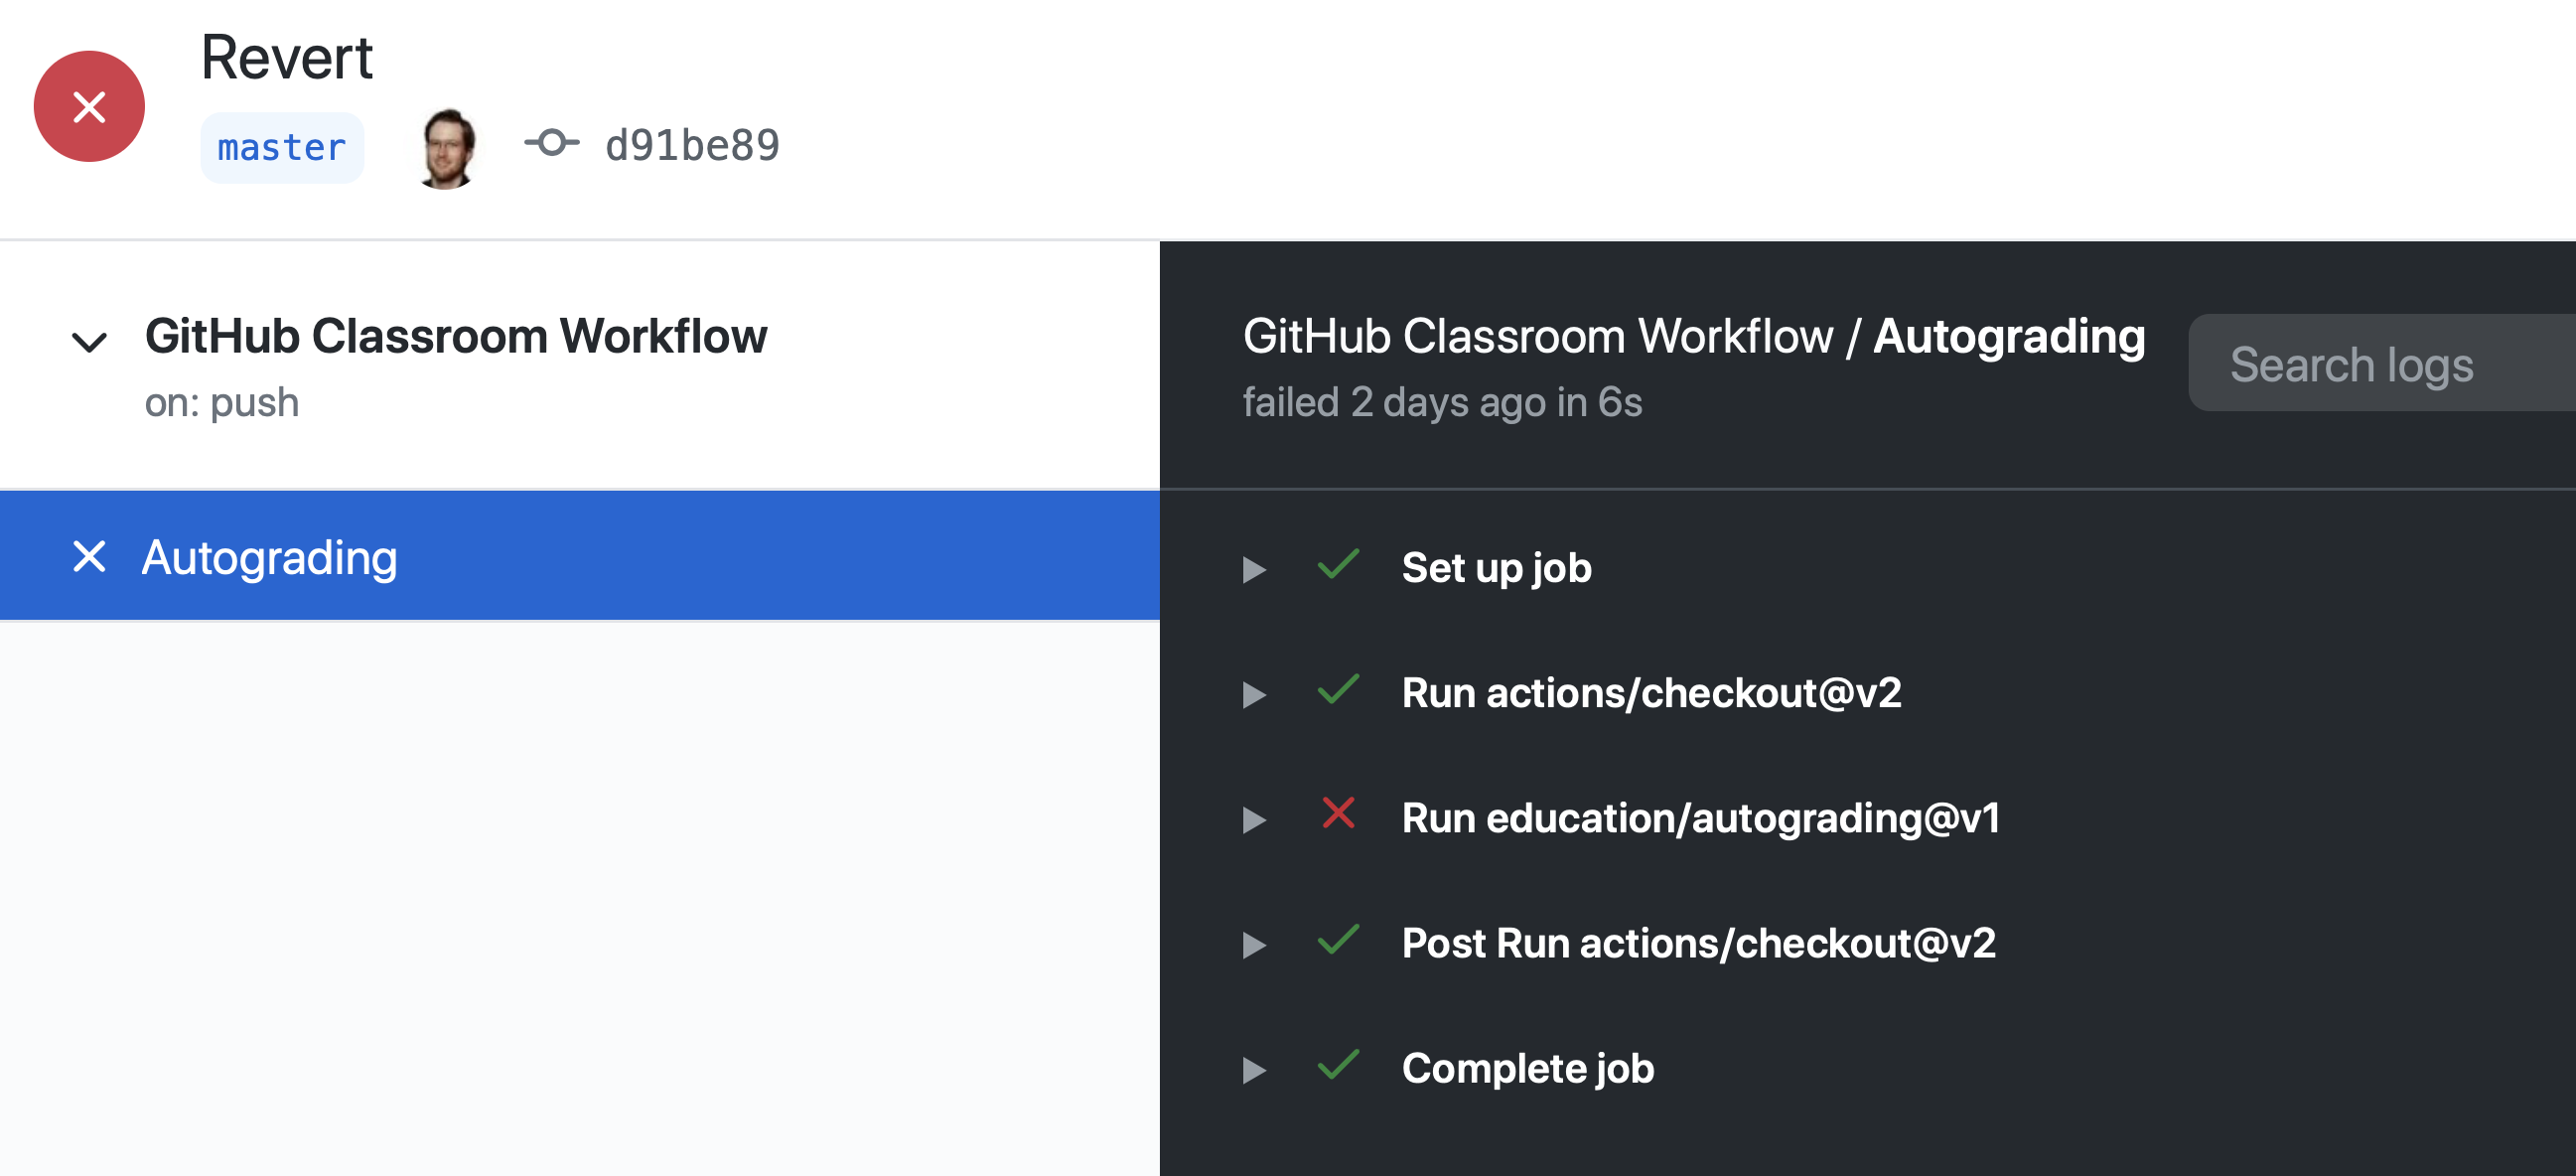
By expanding the line with the red cross and scrolling down, we can see the details of the test that has failed. Hopefully this will give us some indication as to what we have done wrong:
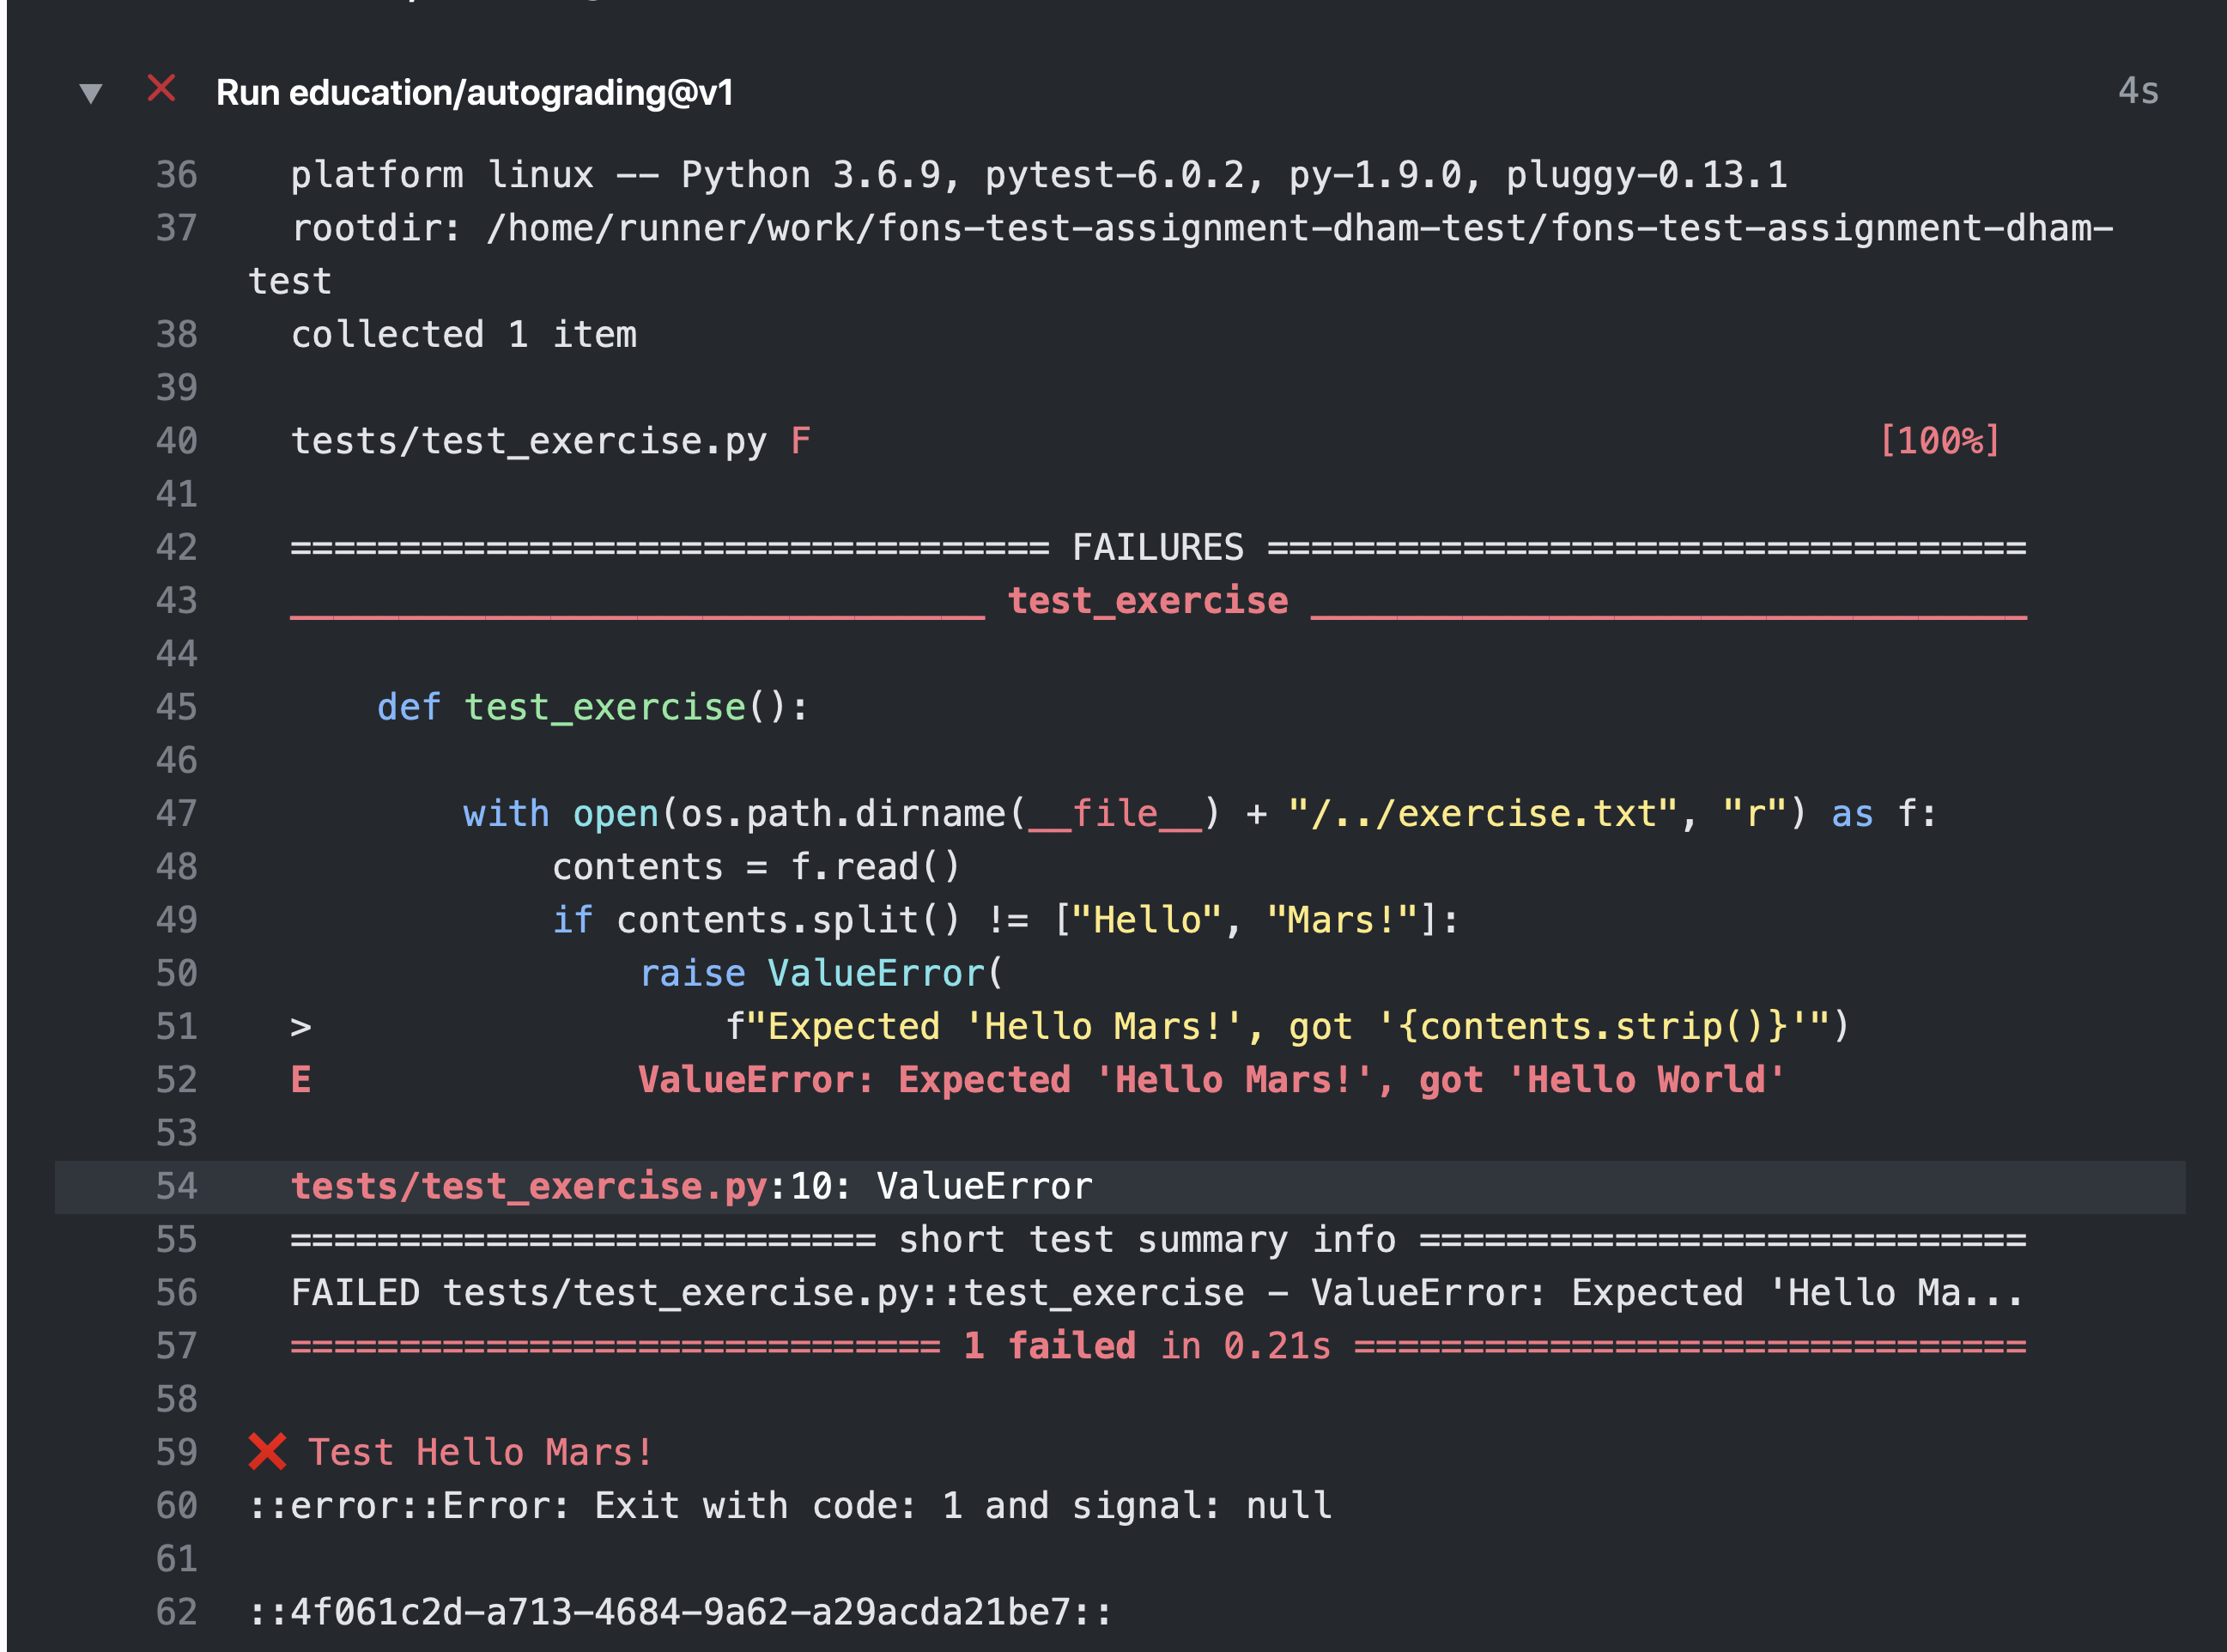
This is indeed very useful as the error tells us that the test was expecting “Hello Mars!” but instead found “Hello World”. This is clearly a trivial example. The precise form of the tests and the feedback they will provide will vary from module to module, and will depend in particular on which programming language is being used.
Footnotes
- 1
To use these installation instructions for Chrome OS you first need to set up Linux on your Chromebook.